The following hints and tips are cheap and cheerful ways of combatting technical problems
found during the repair and fabrication of electronic equipment.The sort of infomation
not normally to be found in text books. For convenience using search-engines,
use keyword divdevtips to target these files.
If it ain't broke, don't fix it
Bert Lance (1931- ) in Nations Business May 1977
Or as I prefer it - If it ain't broke ,don't poke
A number of the pictures are now apparently not downloadable, because the hosts have disallowed
remote linking although not saying so. To view them , you have to remove the picture file name
from the picture URL and put this .htm file name in its place
and scroll down to the relevant pic.
Should the location of this file change please use the keyword "divdev7" in a
search engine to find it again
Some hints for determining the age of equipment not marked on serial plate,dating old kit.
The best is date codes on ICs. These are usually 3 numbers say 712 distinct
from the IC type number which is usuallly letters then numbers. For 712 12 is
the number of weeks (ie march) into the year ending 7 . But is it 1977 or 1987 etc. The
70s printed numbers are usually more angular as though printed in the fonts available to
an XY plotter. Also the IC series number is usually indicative of the era.
For Sanyo ICs a number like 4C1 probably means 1984 from the '4'.
Do get the decade you have to look at the quality/font/style of the lettering
For Sharp ICs of 1980s, date code example 226A = 1st week of June, 1982
2 2 6 A
| | | |--- production week A,B,C,D,E (A= 1st week)
| | |----- production month (1,2,3 ... 9,X,Y,Z)
| |------- denotes last digit of year (1982)
|--------- denotes the I.D. No.
May apply to other decades and makers than Sharp
For other Japanese dating convention apparently.
Hirohito was crowned Dec 25, 1926, but the new one was crowned 7 January 1989.
Some parts made in early 1988 were date coded with a year of 62 (they
start at year 1 maybe), and after 25 December 1988 were dated year 63.
Since it is considered unforgivably rude to prepare for the death of the
Emperor, things made in early 1989 were still date coded 63 for a short
time. It's also rude to continue to use the old dating system, so some
companies stopped production until they could change the dates.
Very likley then things produced went from a year of (6)3 to 1.
Larger (power handling) package/hybrid ICs of the 70s were a lot
less standardised than later. Other
indicators dark brown paxolin circuit board would suggest 60s rather than 70s as would
carbon resistors rather than metal oxide (no bulges at the ends of the barrel).
Also the sizes of 60s and 70s resistors tend to be larger than what is actually
required for heat dissipating. E-line transistors come in the 80s .
Places to find dates are sometimes large
electrolytic capacitors, polycarbonate capacitors,large transformers,loudspeakers ,relays,
microswitches,motors , some
small rectangular radial lead caps ,body of air vane tuning caps and some small transistors
have a datecode. Clear wrapped ribbon cable tends to be 70s, grey covered ribbon
cables tend to be 80s and thin tape type with foil conductors tends to be 90s.
PCB traces from 60s onwards tend to get less angular and more curved by the 90s ,double
sided traces on boards tends to be 80s onwards.
Wire-wrap terminations for wiring looms 1960s and early 70s.
The year of introduction of certain types of connectors
gives a lower bound, eg Scart/Peritel would not be found
earlier than 1977 and those would be in French kit,
the earliest date for mini-din would seem to be 1985, (8 pin minidin used on
Sharp GF 990G ghetto blaster , probably 1982 manufacture)
The pitch of IC pins of course gets less than .1 inch only 80s onwards and surface
mount tends to be 90s onwards, certainly in use by 1988. Feint red LEDs started coming in late 1960s, brighter red early 1970s, green mid
1970s, superbright LEDs in early 1980s, blue in early 1990s.
For Technics / Panasonic ICs of the 1970s date codes probably take the
form a single number then in smaller script and underlined
HEX digit, ie 9 plus small underlined D would mean 1979 14/16 ths into the year.
After year 2000, eg 5007 presumably week 07 of 52 in year 2005
JRC IC maker seems to use this convention of reversing post-millenium dates, (confirmed in a second piece of otherwise dated 1993 kit - 3014 datecode) - do
others ? Or ignoring tens year as 2012 dated kit showed JRC ICs with 2xx datecodes. Unless you find 2 or more IC date codes from
different manufacturers agreeing it is often more a feel
or balance of probabilities for a date.
Dating CMOS ICs when there is ambiguous year date code.
Both A and B series around in 1976 to 1983.
When did A series cease production ? they came in about 1968
Looking through a small pile of salvaged CMOS, earliest
plastic package B series suffix "BP" was 1983,
RCA suffix for plastic DIL was "E"
NEC TO3 transistors with alphanumeric quad starting with L
may mean 1972 and M 1973, maybe later/earlier year correspondence.
After about 2000 pcb overlays often have the date as distinctive slanted
"7 segment display " font numerals of 2 number year then 2 number week
as a 4 digit code as on iCs, eg 0433 , 33rd week of 2004.
If there is mention of RoHS on stickers or overlay or "PbF" on fuses
(both meaning lead-free) etc then probably 2006 or later.
The CE mark came in on electronic equipment in 1996
Silicon TO3 package power transistors for use in domestic equipment
came in mid 1960s (earlier for military use). eg (maybe inaccurate info )
HH Scott model 260, 80-Watt, Solid State integrated stereo amplifier , 1965,
used 2N3055 1967 the Silicon NEC 2SD143, 2SD218 (TO3) in Sansui AU-777 or Sony 2SD45
Sony made TO3 transistors such as the 2SC41 in 1959
Marshall amplifiers pcb overlay "7 segment" dating would appear to be WY where W is
2 digit week of the year number and Y last 2 digits of year
ST ICs post 2000 with code number such as
letter letter letter 619 probably means 19th week of 2006
Alpha pots post 2000 with large stamped number and letter such as 6H , (H=8th in alphabet) ,
stamped on the case rear, probably means 2006, week 2x 8 ,2006 week 16
2EB26/T and 72/193R
Any original label with UK telephone number on it ,
all number telephone numbers came in 1966 but exchange names on printed labels were
still around in 1975 but had gone to all number by 1985
01 became 071 and 081 in 1990 ,
exchange numbers had a "1" added as the
second digit in 1994/1995 and 023 numbers came in 2000
An audio amplifier with year code of 5, perhaps 1985 or 1995, has a DVD labeled input
could not be 1985.
IC Date coding systems
A useful resource, shame its as excel file for some odd reason
http://www.avnet-logistics.eu/fileadmin/user_upload/Date_Code_Collection/AL_DC_collection.xls
Date marks on mouldings and PCBs
Moulding example
Plastic moulding with raised print 82 83 84 85 with a small moulded
pip over both 82 and 83.
Then a 1 to 12 'clock face' both with an arrow next the figure 8.
A centre pop dimple in the mould above
82 in 1982 and then another over 83 in 1983. Leading to
raised small conical pips on the plastic. Probably means
8/12 year or August 1983
PCB example
White silkscreen printed
panel on the overlay of a PCB, presumably with date coding.
A left panel and right panel consisting of
1 to 6 along top and 5 dots in each column so 6 x 5 dots
Right panel marked 7 to 12 and similar array of dots
but the third one down under the 7 was missing.
Probably third week of 5 weeks of July.
Central pannel had marked like this
02
??
??
05
The queries were probably the remnant tops of numbers from scrubbed out
03 and 04 so probably like in the plastic case 03 is scrubbed
end of 2003 and 04 scrubbed end of 2004 but still leaving the 03 mark
not ground away completely from the mould.
So probable screen printing date of mid July 2004
Peavey amp dating , if a number starting P 00Y..... is seen , it probably means year 200Y
Tip for Vinyl record decks with small weight anti-skate mechanism.
Where the cord is looped on to the anchor rod push a plastic
circlip over the end of the rod to stop the cord dropping off.
Anglepoise lamp/ Luxo lamp.
Usually used with a maximum bulb rating of 60W
but if you use a directed reflector type lamp Ro80 type
with internal silvering that directs light and heat
forwards, for such a 60W one, you get something like 150W in
the direction you want it without the lamp shade/
lamp socket getting excessively hot.
Tip for bodge "repair" to awkward slide switches with poor contacts.
Probably no good long term but for the situation where it is
part of a ganged switchway and a hell of a workup to replace.
Only for use on low voltage switches. If cross contact
conduction produces crossover or distortion then you
will have to replace anyway.
At the top of these ganged switches is often a small hole. Make a small
ring of "blue-tak"/plasticene and scoop graphite into the hole.
Then with the thin bore plastic tube of a can of
switch cleaner squeeze the blue tack around the end so
you can blast graphite into the switch with the cleaner.
If this doesn't work then inject graphite and silica gel (silicone grease)
paste into the hole in similar manner. Use a syringe
perhaps with small bore piece of polythene tube attached
if resticted access.
Large feet for large kit like stage amps.
Use rubber door stops from ironmongers.
Or cheapo sink plugs with centre mount removed
and packed out inside with washers and stained black.
Use the other way up as skirts around and under cracked existing
feet to reinforce them.
For smaller feet, but stronger than those flimsey grey
plastic things, use football/rugby boot studs with a securing nut inside.
HH amplifiers etc, broken end-cheek carrying handles.
Black plastic handles that are broken on one side only
not totally broken but dangerous and weak
and too small a cross-section to glue. Or reinforce a 30 yearold handle before
it breaks (replace glue for heatshrink).
Cut a length of large heat shrink and slide/pull through
the break to lie around the handle.
Chain drill 2 slots either side of the handle in main body
of end-cheeks. Pass one 10 mm cable tie through these
slots and another through the heatshrink. Pull tight with
2 sets of pliers. Heat the shrink in place.
Replacing pivotted parts using torsion springs
eg cassette holder flaps and cassette write-protect
sensing arms, often in awkward positions so cannot hold back
the free end and fix in place at same time.
Hold the spring back with a small cable tie around the
part and spring end. When replaced cut the cable tie
IF coil alignment tools for the ferrite slugs
A good starting point for making is to find some plastic dart stems
that no longer hold their flights/fleches. Cut down with
knife or small grinder.
Counting-off turns prior to coil rewind.
If the coil has undergone long term heating the enamel
on the wire can part melt / fuse so play a low temperature
hot air gun on the coil while unwinding on a coil
winder machine. General point pull the retrieved wire
away from end faces to avoid snagging and also go
slow at ends as more likely to have dropped inwards
over time with thermal changes. If the layers are disturbed
at one end so they 'underlap' with the wire breaking then
cut down to the bobbin core leaving that section till end
and cut off and count by eye. Count the remaining major section off
2 layers at a time. Count off what you can and
remainder, if continally breaking (eg 40 to 46 SWG), then
cut axially with a knife , pull off and count by eye and weigh a representative section,
then weigh total mass of coils to determine ratioed, the number of turns.
Missing ceramic reonator in remote control
Get some salvaged resonators and try each in turn
300,400,455 and 500 KHz would be the most common used.
Or try a medium frequency generator of a few volts , 2 to 2.5V, pk-pk sine
fed into the resonator pads and see what effect on receiver with
different f settings when a key is pressed.
Disassembling standard ball races.
That is for cleaning or the anulus rings make good packing
pieces for adapting things to shafts. Also perhaps where
a race needs replacing but cannot release and can get away
with replacing ball bearings only.
Prize off the ball separating ring that is push fitted into
the outer anulus. Then in a box, to catch the balls, move
all balls to one side and central anulus will move to release
the bearings. Ball bearings from ball races tend to be
very accurately machined to standard dimensions useful
for guaging dimensions in awkward places.
Front panel illumination.
Instead of festoon bulbs or numerous bulbs consider
computer case gizmo elecroluminescent panel or string
fed via small inverter from 5 or 12V.
Cable hank hooks for backs of amps to wind the
mains cable around.
Plastic 22mm pipe p-clips/nail clips , single fixing like electrical surface
wiring clips but larger. Hold the fixing end and the open
hook end with smooth pliers and heat the inside surface
with a low set hot air gun until soft enough to
straighten out and let cool. Or 22mm overflow screwed pipe clips,
hacksaw off one horn and cut away the support of the other before
melting.
If only white or grey ones available then do like
in the "japanning" tip, but at lower temp.
"Japanning" bolts for cabinet fastening.
Gives a more durable finish than painting
with ordinary black paint.
A use for that photocopier toner in the used/recovery
bottle, or if access to old coloured toner for coloured
printing on photocopiers (not modern colour photocopiers)
you can do other than black.
Cover the thread of the bolt with kitchen foil, grip in
pliers and heat up , to well over fusing temperature, with
a hot-air gun and dunk in a pot of toner.
Rattle off excess coverage and excavate excess in the slot
with a needle while still hot.
Blown primary, how to determine unknown secondary voltages
and current ratings of a mains transformer
Simulating a multi-secondary transformer using a known
good one but not using the primary, to get some data.
I used a variac supply near the bottom of its range at 18volts and a 25 ohm,
20W dropper to feed 50Hz (UK)ac into a secondary. Assuming you have a
reasonable idea of the voltage of one 'unknown' secondary.
The transformer I used first was a high grade enclosed Gardners, 1.3Kg but only 15W combined outputs,
240V (UK) with marked 2 separate secondaries of
6.3V, 0.6A and a 150-0-150 at 25mA.
With 3.43V ac on one '6.3V' secondary there was open circuit 3.40 on the
other isolated '6.3' and 161.4V end-to-end on the '150-0-150' and incidently
116.4 on the primary.
Then loading with different resistors
100K, 161.4 drops to 159.1
5.8K on 161.4 drops to 55.8, 3.43 input drops to 1.64
swapping to 5.8K on 3.4 , no change
1K on 161.4 to 12.1 and 3.43 to 0.771
swap to 1K on 3.4 , drops to 3.39
270 ohm , 161.4 to 3.34V
270 on 3.40, drops to 3.37
56 ohm on 161.4 to .704 and 3.43 to .54V
56 on 3.4 , drops to 3.28 and 3.43 to 3.42
8.2 ohm on 3.4 , drops to 2.55 and 3.43 drops to 2.99V
A bit more generalised.
Noting that for one secondary for this test transformer was rating 300V,
25mA then V/I of 12K and the 6.3V, 0.6 secondary of 10.5 ohm.
Doing as before powering a 6.3V secondary to 3.43V and '300V' was 161.4V
then loading it until the voltage ratio was 80 per cent that is 161.4V down
to 101.5V and 3.43 falling to 2.69V so 101.5/2.69 = .8 then that R is 12K.
So for similar transformer construction and high V, low I then find that
value of R for 80% then if V is known then current rating is V/R.
Doing the same for the low V,high I one then for R=10.5 ohm then
corresponding ratio drops from 1:1 ie ==3.43:3.4 down to 3.03/3.43 is 88%
for high current , low voltage.
So for similar transformer construction and high I, low V then find that
value of R for 88% then if V is known then current rating is V/R.
Other clues would be the gauge of the wires if they can be seen and the
overall size and weight giving an idea of the overall power rating.
Resistance checks would show which are more likely high V or high I.
An ac inductance meter will give some useful
information also.
Second test with a more basic Albion make, .8Kg, 20W open
construction 245V primary, 2 secondaries 17V,1A and 6.3V,.6A.
Again putting current into the lowest secondary giving 5.59V on
'6.3' and 14.52 on '17' (185.8V on 'primary')
6.3/.6 wire was 24thou diameter and 17V,1A wire was 27 thou diameter.
17/1 = 17 ohm. This time loading the 17V secondary with
17 ohm meant the ratio had dropped 69 per cent (15.52/5.59 to 2.778/1.544 )
Usually you would get some idea of one rectified V from max or min, by
capacitor ratings or a regulator voltage etc.
For main filter caps reduce to x0.75, then divide by about 1.4 to get
an RMS secondary voltage.
Valve radios would have one secondary connected to the
heaters so usually 6.3V. A vacuum fluorescent
display is likely to have an isolated feed in the range only 2 to 5V
Toroidal transformer 2x 120V to 2x 15V,2A, .75Kg and 2A wires
33 thou diameter. Characteristic R = 15/2 = 7.5 ohm.
Critical ratio in this case was 82 per cent with 7.5 ohm.
15.27 input on '15' giving 15.26 on the other and 108V on
one of the primaries.
With 7.5 ohm 15.27 i/p drops to 3.91 and 15.26 drops to 3.19.
For a large toroidal 500W 2x 35V, 7.1A , weight 4.8 kg
Secondary wires consist of 2 paralled 56 thou diameter wires
per secondary.
Characteristic R= 35/7.1 = 5 ohm.
With 15.16 on one 'secondary' 15.1 on the other and 49.8V on
a 'primary'
15.16 dropped to 2.59V and 15.1 dropped to 2.46
so characteristic ratio is 95 percent for this transformer.
High voltage for portable equipment.
Like HT for a Guiger Mueller tube
Use something like a 240V / 12V transformer
the wrong way round. An oscillator not necessarily
50/60Hz , pick the most efficient f, via switcher transistor to the 12V coil
Problems with ceramic daughter boards with SM devices.
Often a problem in Akai VCRs. All painted with epoxy?
black paint and themal variation or chemical action must
force the SM chips away from the board. As no known
solvent for clearing off the epoxy a matter of
draping nylon cable ties and halved clothes peg
wedges around the ceramic board and chip to physically
hold down in place. Tie the wrap and then force in the
half-peg wedges to tighten down sufficiently - lovely bodge.
Magnifying spectacles
Starting with 2.5 dioptre reading specs (dependant on the
person's sight) and a cheap and nasty pair of plastic
binoculars - did't even state manufacturer or mag. but
about 9x30mm. Two monocular barrels without pentaprisms
and central flat section with double pivots and thumb-screw.
Remove the front double 30mm lens section and mount on the
specs with a couple of plastic cable clips, nylon pcb stand-off
and glue.
Gives double monocular, not binocular, of about 4x mag.
and 130 mm of clearance in full focus depth.
Extending pot of Tipex, that has dried out
Cut down a mastic tube injector cone to a size that matches the rim
of the pot. The pastey tipex on the rim will form enough of a
seal to the cone to pour some nail varnish remover acetone in there to
pad out.
Callibrating a DVM and cross-calibrating a standard cell
For anyone with access to a Weston cell but not access to a 5 or 6 digit
DVM.
I think this is how I cross-calibrated.
I've dug out the docs and mine was calibrated at manufacture as
1.01866V at 20 deg C and -40 ppm/ deg C , 14 March 1979.
estimate of uncertainty 10 ppm
About 2002 I did the following with my cell and someone else's
secondary standard cell.
My DVM has a 300mV range for its 4 digits, or 200mV will do the same.
With a NiCad in good condition in mid discharge and left for some hours to
reach room temperature is a nominal 1.2V.
What the actual voltage is does not matter as long as it is stable.
Assume for convenience here 1.2V.
Only use with DVMs ( high input impedence) .
Then commoning negatives of Weston cell and NiCad, measured the difference
so came in the 200mV range.
Which brings it into the first digit '6' of 1.01866 then ratioing of the flashing
digits gives an estimate for the fifth digit.
So reading of 181.4 mV
With DVM 2/3 time reading 181.4 and 1/3 time reading 181.3 so implying about
181.37mV and Weston Cell voltage of 1.01863 at 22 degrees C. The other calibrated cell / DVM test
was about 1/3 to 2/3 the other way round on last digit agreeing with that
cell's yearly calibration value, allowing for 22 deg C.
At the same time I checked a small Muirhead standard cell salvaged from a bit of kit
and it too was many years old but almost the same voltage, only last digit
(ie 1.0186*) different again.
Splicing broken audio cassette tape.
REquired a "stickit note" - where a bod was trying out glue formulations
and one failed miserably,just a tackiness - what can we market it as. ?
Anyway lay overlapped ,in line the broken ends ,active ferrite side down
against the glue. With a razor cut diagonally and remove the surplus
triangle of tape. Cover with some thin vinyl tape. Turn over and remove
the stickit note,the other surplus triangle and pair back the surplus
vinyl tape.
"Hub puller" for CD mechanism platter/spinner removal
or can be adapted for small motor metal-pulley removal.
Required some perforated metal ( 1/4 inch hole spacing ) - if
staggered lines and rings of 6 holes around each hole then easier.
The material I had was internal aluminium divider plate from
a scope, about 0.04 inches thick. Cut a strip 3 holes wide and about 17 holes long.
Cut a central V notch so can slide under the platter and lie centrally.
Bend up into side view D shape and bolt together around cental
hole. The central hole takes a 4 mm hex head 25 or 30mm
high-tensile machine bolt and nut that
can be restrained/locked in place by the 4 small 3mm ,
countersunk heads, if suitable hex nuts, surrounding
the 4mm nut .
Grind the end of the 4mm bolt down in diameter by holding in a
loose sleeve so can rotate round while grinding, slightly tapered,
so the tip, plus a bit, is less diameter than the motor spindle.
Measure the gap under the spinner
with feeler guages.
Grind/file any edges on the D-strip, assemble and place over the platter,
tightened into the spindle hole with allen key.
Surround with some card to protect from direct heat and
heat the central platter/ motor spindle with hot-air gun.
With luck there will be a click on initial shifting or re-engage
hex key and turn some more .
Remove and with glove and allen key push further.
Instead of making long thin and fragile bolt end use small
ball bearings as packing pieces to continue removing the platter.
To replace then heat up and using a glove place back on
shaft with feeler guages in place for correct gap.
Loudspeaker coil rewinding.
46V DC on 8 ohm 10 inch speaker, didn't last long, going o/c.
Decided to try rewinding as I've never tried it before. Found a clean way to
remove the cone from the frame. Desoldered the braid connections, indented
with a centre punch through the cone periphery into the
steel frame for re-alignment. Heating
the frame with a hot air gun and pushing the periphery of the cone with a
well used and rounded wooden kitchen spatula, separated cleanly from the
gummy glue.
Put in spacers to stretch the inner dust diaphragm and hot air gun heating
unglued the periphery of that corrugated disc.
I didn't expect to see what was inside. A burnt mass of wire and the
innermost end of the penetrating lacquered paper cylinder neatly burnt off
in a perfect ring.
Gap in magnet about 66 thou, paper cylinder about 5 thou thick and 2 layers
of about 2 x 30 turns of 6 thou wire (originally). I don't fancy trying to
rewind on a small paper cylinder and fixing to the remnant all with such
XY&Z precision to clear that 2x 25thou slot gap in the magnet.
Decided I'd throw it out as a cheapo one anyway. I imagine winding the
wire over the lacquered paper on a mandrel and perhaps some
25 thou shim material in outer part of the gap temporary
on re-assembly. Some flattened while molten hot melt glue
string around the periphery. Clamped temporarily in place
on the rim, powered up with a watt or 2 and cone radially pushed
N,E,S,W for problems before final heating to set the rime band
and perhaps repeat active test again before regluing the dust
diaphragm.
Looks as though such speakers use a sort
of air bearing/ ground effect.
Inside diameter of the slot in the magnet something a bit less than 1.502 in
so probably 1.5 inches. Inside diameter of the paper cylinder that goes
inside the magnet gap about 1.65 inches so with a gap width of bit greater
than 66 thou and paper plus double thickness coil of 15 thou means the wire
cannot touch the outer diameter of the magnet gap. And I just cannot believe
that in all operational circumstances that the inside of the paper cylinder
can never touch the inside surface of the slot with only 7 thou of
clearance. A silicone treatment to the inside surface of the paper cylinder
would make sense.
Knowing that I might have a go gluing a new bit of cylinder and new coil to
the existing remnant of cylinder as there is plenty of external room for
excess glue/binding. As a mandrel a cassette DC motor is about the
right diameter and also for winding purposes it might be more
practical putting the spindle in a vice and winding over the motor rather
than using a winding machine as the end of layer reversal needs to
be more accurate than usual coil winding.
REW and FF problems with always laced "wrap around head drum" vcr types
Assuming no problem with the motor or slip clutch ie putting
a doab of correcting fluid on the exposed end of the capstan
spindle shows the motor slows down when the tape
tramsport slows down. Problems particularly with REW
when most tape is on the supply reel or FF when the take -up
spool has most tape. Try with fingers either side
of the drum for tape tension. If the leading tension is
noticably more than the lagging tension then try the following.
Paradoxically try increasing the
braking tension by upping the spring guage. The felt on
the brushes and the areas on the spools probably
polish with age. There is a "skin effect" between the spinning
head drum and the moving tape. Too little back tension
and the aerodynamic cushion disappears but increase
the back tension pulling the tape closer to the drum initiates
this air cushion and reduces the drag.
Maplin N76KH conversion to a non-contact tide gauge (
fix a metre or so above maximum expected tide level, export
data to pc and take negative of it wrt to some reference value)
7-segment LCD to BCD decoder ?
Assuming one back-plane to consider , what would be most efficient component-count/least complex discrete/CMOS/74 route , ie not pic/Pi/uC to firstly convert the ex-oring business to proper levels and then the "mapping", output could be linear per digit rather than bcd.
Starting with an off-the-shelf commercial unit where the LCD display is driven off a uC, to give a remotely monitorable feed
The other consideration is often there is a contrast control which AFAIK is variation of the fractional step change voltages, so more complication unless you set for one contrast setting only
just 0 to 9 digits, no alphamumerics, not even +/-
The on condition but no reading state of the display is 00.00 but I can ignore the "." , its fixed range
s no fast response is required , would this work? I really don't want to get involved with GAL programming .
Plus perhaps some level shifting or inversions and just considering 1 digit.
A free-running all states sequencing BCD source, until inhibited.
Feeding a CMOS 4543 (BCD to 7 seg LCD) , the backplane feeding the PH pin of the 4543. Then compare LCD 7seg pins and matching 4543 o/p pins with a couple of 4082 quad-AND packs ANDed together to provide an inhibit back to the BCD source. Taking overall output as the BCD source lines when inhibited.
For this use an update as infrequently as once per minute would be adequate, so plenty of room to put a monostable or something in there somewhere
There is no H&S or safety-critical aspect, the input is always slowly varying over hours, anything wild of that , must be reading error , as long as it occurs less than say 10 percent of the time
I'll have to test out the preliminary stage, with 1 digit, if that works , then onwards.
With luck there will be something useful as a clock source on the uC of the off-the-shelf device. Even the professional 1500 GBP kit has the odd glitch in the output. 15 GBP for a commonly available near equivalent for the sensing and display device, plus a bit of my time , for a useable device is well worth trying
I was not aware of 5 segment minimising
Just in case any hacker-types here (purists turn away now)
Got a bit bogged down with the first stage of extracting 7seg data.
Chinese made kit with uC buried under black epoxy.
20 LCD lines wiht nice ATE pads for soldering external wiring to.
Decided on cutting and re-making 3 LCD traces , as all segments are lit at POST, to determine the multiplexing structure. 4 backplanes and 16 channel , 4-level drive voltages, for digits and anunciators. 2 channel per digit split vertically into abc,dot / defg
In this case to extract the segment on/off data, doubt it is generally applicable though . I'm only interested in 2 digits, so 3x4 matrix of 3 BP (dot , c and d not used) and 4 channels. Used a bridge of 4x4148 and 100nF, then a "pull-up" resistor for the off state, connected lowside rectified DC to supply for each of the 10 monitored pairs.
Using the original 3.3V supply and feeding the floating quasi-DC low and high to 4070 exor gate inputs of one gate per segment, the low-DC side off state needs pulling high to give reliable Exor "0" output. So LH for H out,ie "on" and HH for L out,ie "off"
Pull up needs to be 100K or higher to avoid disrupting the original LCD display, underlying uC operation unaffected.
Now to progress to original query placed here, as at the moment just 2 simple unmultiplexed 7 segment LED displays reading the same as 2 LCD digits (ignoring c and d and dot segments)
2.5 digit bcd to 8 bit encoding?
So 0.00 to 3.99 to 8bit and then via simple 8bit RS232. The data is well behaved , just going up or down slowly.
As limited to hardware conversion/encoding at the sensor end (pc at the other so no decoding limitation there), thinking
Send as packed BCD of the tenths and hundredths and then hardware encode onto MSB only when it is 1001 "9", the units 0to 3 reading as 2bit binary on the D5 and D6 bits. Then on the pc "stick or twist" the units logged according to whether the next tenth sent reading is 8 or 0.
I suppose in the general case 9.99 could be encoded like this for 0 to 9.99 using D1 and D2 on the LSB but would not be reliable for general data or jittering around the .9.
Any other harware conversion/encoding idea I might consider?
Don't know if it is compressing or encoding but using some of the easily resolvable "illegal" ABCDEF codes of the otherwise unused bits in BCD to encode the units data and then use the pc to extract and manipulate back to 0 to 3.99.
By stick or twist I mean
If tenths 8 follows the tenths 9 sent data, stick with the last unit integre transferred
If tenths 0 follows the tenths 9, then unit twisted to last transferred unit +1
The way I see it , there is 100 datapoints , in 2 ranks tenths and hundredths , leaving 156 unused places to hide 4 datapoints for the units. Using the most appropriate place to hide them , which for hardware manipulation would seem to be D5 and D6 , unused in 8 and 9 representations of BCD,1000 and 1001, of which 9 is the easiest to gate from.
yes, perhaps I should have termed them don't-care rather than illegal.
In hardware terms , for the send end, AND D4,D7 (active H for tenths digit 9) and output goes to feed the control of 2 analogue gates that pass the 2 bits of the 0,1,2,or3 units data onto lines D5,D6. Convert to serial, and pass to pc where look-up or whatever will decript back to 9 and the units figure
It is well behaved data. I'd only be passing the units,u value, data superimposed on (.)9x when it is sent , so the receiver has the previous units value u' for logging and only has to monitor whether the next ,non-9 , data is 8x or 0x to know whether to log u' as u or u +1
eg for amended BCD of 1001xxxx and units value of 2 ,
transmit 1101xxxx
then if the next non-9 data is 1000xxxx then units value is still the 2
if the next data is 0000xxxx then units value is 3
The transmitted data is full 8 bit data, not packed double BCD subset.
The only way the decoded data could jump 1 unit between samplings , is if there is an error in the sensing,coding or decoding, not the original input, so it can be ignored in software if a random glitch and flag as -9999 ,or whatever, or the whole system is broken anyway. Decoding would by VB on a pc, so no limitations there.
I've no means of programming pics or controllers ,without kitting-up for all that plus learning to use it all, too long in the tooth for that now, and this is just a one off. Bits of paper and soldering iron only for me
well behaved input
packed double binary of 01110111
with unit 2 or 3 logged from the previous pass in the x.9x data
and wait for the next x.9x transmitted data to update the units info
As it stands I have 3 banks of latched BCD, 2 bits for units and 4 bits each for the tenths and hundredths.
Hold lines D5 and D6 low until the 2 analogue switch gates pass the units data into the "9" encoding when both D4 and D7 are high.
i meant droppered instead of held , so can be H or L for 0 to 7 use but data passed by the analogue switch takes priority in the "9" tenths situation
20 line lcd ribbon with ATE pad per trace, great for soldering to.
Gnd pad is batt black wire
Vdd pad is 3.3V of IC2 volt reg, 713A-1 (HT7133A-1 ?)
305M 1005 222D
CB-1005D V1-3 on overlay
Excess bare wire of all leads to pcb so add hotmelt
D5/T1 resonating transducer Tx
3.58M xtal
2x 2TY, J3Y
desolder 2x LEds and the laser
6sc then 2 on backlight panel
no components on rear of pcb
9V at Q7
to identify traces to LCD elements, cut traces to see what is absent
at POST when all elements are powered on
line7 Digit 6, a,b,c,dp
line8 digit 6 ,d,e,f,g
line 9&10 for digit 5
line 11&12 for digit 4
line 16 is digit 2 d,e,f,g
17 is digit 1 a,b,c
line 18 is 1 d,e,f,g
20 is area ,m1,m2
BP8 ,line, BP7
f,4,a
g,3,b
e,2,c
d,1,dp
maybe the epoxied uC is like uPD7225 but with keypad functions
anunciators
area
vol
-
m1
m2
m3
low bat
2 3
feet
2 3
metre
2,3,3 metre
area
line
5
keypad line nearest LCD
in off sw position 0 and 3.3V shorted
net curtain over the usonic output allows 6m range and keeps out
insects. Tried 3 to 4m range vertically over water.
line 2,3,4 4 level signal
line7 2 level signal
line8 4 level signal
used LED and 200R for debugging
4x4148 around 100nF for decoding to DC, to feed to 4070 gates
as a sort of comparator. Take lowside to 3.3V via 100K gives a compromise between
least disturbance to the LCD display and absence of L to H
gate transistions. Without a 7 segment display in place for debugging
purposes would also help resolving.
Ignore c and d segments for decoding purposes.
laser diode 2.1V over it
60R line1 of the connector to gnd for measure function , goes to R34.
BC183,120R and 1.2K between 3.3V and 0V for control off the main gauge timer IC
Used simple 22uF and 1K monostable in effect, to a cut-down Darlington TIP121
instead of the BC183, not enough gain.
One CMOS package failed to change state with 3.3V, changed the
"bridge" to 100nF and 4x SMD double epitaxial to give more DC.
Testing with .91V sine at 400Hz gave 1.14V dc
Do NTE series ICs exist
Did they ever exist?
Why would some company make IC eqivalents for ICs that were used in 30 year old domestic equipment? I could understand, for keeping ancient industrial equipment going. Or is it just another Google-ad income generator?
eg NEC uPC1167 FM radio IC of circa 1980, apparently equivalent to NTE1488, complete with apparent datadsheet with OCR/translation errors from Japanese original data sheet
So whatever the NTE or CGE label says, the underlying IC would be original Sanyo/NEC/Harris or whatever of the 1980s or even 1970s?
I wonder how they disguise the inevitable age-corrossion of the pins. Unless you stored them in vacuum, any sort of storing even in a heated building, UK anyway, the pins go grey with age. Perhaps they do some sandblasting and then solder-pot dipping
Raleigh Mission bike helmet LED
mark sw position,prize off clear cover, replace with sw stem in correct position
On opening the case of some non-working kit.
Have a good sniff,phenolic smell for burned boards etc and there is a
distinctive (fishlike) smell to the electrolyte leaked out of some electrolytic capacitors.
First things to look for with broken equipment after being dropped.
Cracked pcb and traces especially the brown "phenolic" unreinforced boards
particularly where there are connections such as sockets and switches between
casing and pcb. Broken joints to massive components such as transformers, large
capacitors etc. For digital / micro based equipment one of the first things to suspect
is any crystals as the internal connections are little more than friction and the
quartz sliver is easily cracked. Ceramic resonators are similarly prone to failure
under shock loading. Surface mount components easily can have a few contact
legs break away not having the thru board mechanical location of conventional
components. Cut off a fingernail tip giving a crescent shaped clipping.
Run a point along the run og IC pins and sometimes you can hear a change of
note, indicating bad solder joint/s
Cheapskate speaker grill (UK)
In poundland shops at the moment "party" scarves, black and silver thread or grey and silver thread, ignore the purple and silver. One will do 2 dual 12 inch combos.
The one in front of me a Fender that a now ex-cat used as a scratching pad. Left tatty original in place, after removing the (surprisingly metal, looked plastic) Fender logo and screwing back over the half a scarf , slightly stretched over the frame and held with a few drawing pins (not pushpins) . As the scarf material is very open weave, just leave the corners uncut and the velcro still acts through it. Looks a treat, black and silver, just less likely to survive a snagging by cat or whatevever, as steadfastly as the original.
Plastic reading specs
Pre-empt failure of plastic at the bridge. Some 1mm or so iron wire
shaped to follow the bridge and heated with a soldering iron
to seat in the plastic. Cover over with sympathetic coloured
hot melt glue. After a breakage main problem is aligning the 2
parts. A small block of metal to bridge the parts, actin g
like a nose. 2 small engineer clamps to hold in place.
Hold one clamp in a vice and slightly slacken the othe r
to reposition exacly. Some hot melt glue to "weld" the join
and then when cold do the iron wire thing
1206 format desolder tool. Start with a worn standard conical soldering iron tip.
Grind a flat face and then with .5mm Dremmel grinding disc cut a slot down into the
face. Mark the orientation by grinding cuts further down the tip to indicate
orientation of recess as it will fill with solder.
Replacing insulated back TO220 power trannies with non-insulated.
Use a sheet of mica TO3 sized or larger and it will
often register with surrounding parts avoiding
having to fix against slippage when using the original
power trannie retaining clips. Use thermal conductive grease.
I prefer to use metal backed ones as the thickness of mica
is about a tenth of the thickness of the plastic insulation
on the insulated types so insulated against heat transfer
to a greater extent as well.
Internal and external circlip pliers for the very small sizes.
Adapt an old pair of long nose pliers that have seen better days.
Just back from the tips grind a back angle on each internal
face just a couple of mm enough to grip the circlip without slipping.
Preferably on another pair of small old long nose pliers so as not
to weaken the points further grind faces on the external edges
for external circlip pliers. Force handles outwards to use. If
more force is required use "folding wedges" (pair of
small greased wooden wedges back
to back) and packing piece between the handles
Removing pulleys/cogs off the shafts of small motors.
Sometimes ,especially interference fits of steel cogs on steel spindles, the normal heating with
a hot-air gun and levering with a screwdriver blade between cog and body of motor would
mangle the brushes or bearings. Mount the heated cog in the soft jaws of a vice and
hammer the end of the spindle with a pin punch or "pop-rivet" (blind tension rivet) with
end ground to give plain bearing face. Situation where I had a stubborn steel cog that I
would have had to grind off to use the motor for another purpose with a brass pulley off
a motor with larger spindle. Instead of grinding off ;powered up the motor and carefully ground
down the diameter of the steel cog against a spinning grinding wheel stopping to measure
the diameter a few times. Brought the diameter down to be an interference fit for the
hole in the brass pulley.
Letting the steel cool/cooling with freezer spray and heating the pulley to mate.
I would have hade to make an adapter to match spindle to hole in pulley.
Keep a radio on near your workbench.
It can sometimes indicate a problem with mains switches where there is a prolonged crackle
rather than a simple click.
Removing / replacing vol/balance/tone pots on amps etc
Where the pot is close to the chassis and after desoldering the pins there is not
enough leeway to remove the pot. The alternative is to remove the whole circuit
board from the chassis. With a ball mill in a Dremmel open up the chassis on the
away side from pcb side of the hole for the pot bush after removing the pot bush nut.
So making a small "slot" to give more angle to release the pot pins from the
pcb holes. Maybe open up the anti-rotation location pip hole as well if that is relevant .
Push down on the pcb to give a bit more clearance as well.
Clean up /enlarge this slot to assist refixing
Speaker grille cloth
Specially the metalised fancy stuff where a section comes
loose and droops. Should be under "T" section trim.
With "sharlened" chalk mark the continuation of the line
from the still trimmed sections along the sagged bit.
Push a drawing pin at either end before lifting the trim.
Starting at the centre , assuming a selvidged edge
to the cloth , pull with a sickle probe under the pulled
trim until the chalk line is right and anchor with
surface staple gun. Repeat on finer divisions of each half.
A material that may be suitable for basic speaker grill
is camping shop ground sheet "eco mat" matt coloured
open weave.
Ordex non-slip mat 1x 1.2m
Meradiso .3 x .45m vintage speaker grill, purporting to be dining place-mats. About 30 percent open
weave ( not print) neutral coloured, black cream and grey in a sort of art deco slightly wavy ,broken linear
pattern. Threads 0.5mm PVC/Polyester
Battery covers that are more like secret panels.
Inspecting the case shows an area where a cover slides out but no indication
of how to release it . Try pressing into this cover at the edge innermost relative to the
rest of the box ie furthest end from where the cover slides out.
Repairing amps
After desoldering the main driver transistors
remove all the white thermal zinc oxide paste
with cloth or tissues or it gets everwhere, use
new paste for replacements. If old and messy to
remove just cover with parcel tape , wrapped around.
Reinforcing "on-end" large resistor leads to
reduce effects of vibration. Feed some QM socket
pins on the long lead and solder onto the lead.
For small stand-offs for normal mounting cut
down and solder on similarly.
Broken handle
The type with the spring metal interior and soft
plastic/rubber covering that breaks up
by the metal strap cutting it, and matching
the fittings into frame/ sub-frame is difficult
to find suitable replacement. Used by Peavey etc.
Remove the handle and strip off the plastic.
Wind on some spiral wrap cable sleeving from
the housing edge minus one turn at one end to similar at the other.
300mm of 1/4 inch spiral gives 85mm over 25mm handle.
Shown de-twisted between 2 molegrips on the
cabinet. The card under the handle is just for
contrast in the pic.
Glue 4 lines of soft plastic beads or cut sleeving
on the underside of the handle, on every other
groove, will form finger dedents.
Cover with some heatshrink and heat so the wave
of wrap appears and repeat for extra strength.
The ripples giving a bit more sureness of grip. Or simply mark a pair of lines at each end -
where the edge of the cheek is on the metal strip innermost and outermost of strip movement.
Spiral wrap between the inner pair and thick heatshrink between the outer pair.
Retain the broken ends of the rubber as packing inside the cheeks or add rubber
washers if totally broken up , to protect the heat shrink ends from rubbing against cheek ends .
The metal ribbon will have difficulty
cutting through the nylon.
Repairing such type handle end anchors, where part has cracked away and all too
easy for the bolt head to pass through the slot in the steel of the handle.
An insulator from the thru chassis part of a large screw terminal. Measure the gap under the cover ,
large steel washer with hole large enough to pass the stem of the insulator and pass thru the
slot of the spring steel blade and a small washer , outside larger than hole in the large washer
and its hole to take the bolt. Assuming not asbestor reinforced bakelite cut down the length of the insulator to
housing depth minus small washer thickness. Assemble insulator then blade then large washer , then
small , then cover and pass bolt through.
Broken pcb traces and pads, bridging pcb holes that are too small for the
component leg going throuh, so solder cracks, etc
Thats what I've done before and bits of desolder braid and stripped coax
shielding and also scraping back board/trace lacquer for more contact area
and folding back leads along traces before soldering.
Eventually found a hobby shop with what I was after
2 copper and 2 brass 80 mesh 5 x 6 inch sheets, bit finer than I was after
but finer is better than coarser.
Amaco of Indianapolis , Wireform Metal Mesh and Wiremesh woven Fabric.
Presumably bigger sheets of it are used by the mind control nutters.
A 2 hole paper punch makes neat 5mm pads and a needle to make a pilot hole.
While there I could not resist a bag of miniature wooden 3/4 inch long
sprung clothes pegs by Artstraws ,Swansea, (apparently for suspending
chrismas cards, undamaged, from string) for holding small bits while
soldering or gluing (as will not heatsink , useful for holding
thick wire in banana plug recess and then soldering ), and I use the full size traditional wooden ones for so
many things , including broken apart for wedges.
Spectacles and electronic repair.
If your specs have metal side-arms then cover with some
small diameter heatshrink tubing before they fall off in
some kit.
Small 3-jaw chucks , Dremmel size
If dropped and the 3 jaws fly out (and you find them and the 3 springs)
To refit , find a small bottle cap or something , that you can lay
all 3 inside, in a ring , with the springs just located in the recesses.
Then place the outer cone over , press down , and hopefully
at that low compression state , you can get a finger over and press
in home. Don't know what , if anything, was in there holding in place but
I replaced with a rubber O ring.
Reinforcing failed solder pads
Reinforcing solder points on dropper resistors, subjected to
vibration. Forcing a small pad of mesh over the lead and burying in the
solder.
My local decent hardware shop has nothing , a local machine mart has
expanded brass sheet but that is too coarse.
I have used desoplder braid before and stripped coax shielding but they are both messy
for cutting small pads and also pushing mesh over the leads would give a bit
of mechanical grip even without any solder.
For large pads I've also used cut down and cleaned up old perforated zinc as
used in old larders for ventilation but keeping flies out. It seems to
solder quite well but its a bit thick for most components
I can only assume I will see more and more of these bad joints due to
lead-free soldering.
Recently I returned a Marshall valvestate to its owner.
I had previously, last year , had to reinforce solder the main caps, which
is common enough with leaded solder in combos. At that time I did not
realise it was probably lead-free soldering especially as made 1998.
This time 5 different medium size components had bad solder.
Including one I've never seen from normal use rather than over-current/
heating. A flat-pack bridge rectifier had one visually obvious bad joint.
I pushed on the adjascent corner with just finger pressure of perhaps 8 to
16 ounces and that pushed through.
I had told him about this lead-free business when he dropped it off.
When he picked it up he said he'd mentioned it to a relative of his who
works for Marconi Aerospace and he was told the same about the problems
they have with it in their area.
There are plenty of industrial suppliers of such mesh by the square m or by
the m but I was after more sample sizing for this purpose.
The pack of hobby "keepsakes & card" making sheets would be enough for 2,000
or so little copper and brass mesh pads.
Now got enough brass and copper cloth to keep me in pads for years but
I will have to be aware of shedding the odd almost hair sized bits of copper
wire fraying off the edges of this cloth - worse than tin whiskers.
Selvidge the edges of these bits of metal "cloth".
Cold testing an amp
Where there has been major damage involving
a lot of components and before daring to power up .
So testing with removed components or new , with
a DVM for "diode" tests etc. Remove the power
supply reservoir caps to stop the probe
voltage slow charging effects from the caps.
Loudspeaker repairs and reconing .
Distortion due to voice coil rubbing the slot.
De mount and power up at a suitable frequency.
Just in one position very lightly push the cone radially
outwards and the distortion will get markedly worse.
On the vertically opposite part of the cone stick a bit
of insulating tape pulled and wrapped under the frame,hopefully distortion gone.
Then a thin "wash" of hot-melt glue in half inch strips either
side of the insulation tape over the flexible corrugations.
When cold removed the tape .
The following i have not tried yet tip from someone else. I would
use brass shim rather than feeler guages because of the magnet.
And metal caps may be swaged to the body requiring grinding of
at least one swage point to get access to lever off,covering
cone area to avoid iron filings getting inside.
I have repaired many speakers. Using acetone, unglue the cone at the outer
edge and unglue the voicecoil cap. You will need sets of 4 feeler gauges of
various thicknesses. Put the feeler gauges 90 degrees apart in the voicecoil
gap. Put Glyptol glue between the cone and the outer surround and clamp
using wooden clothespins. Leave for an hour, remove the clothespins and the
gauges, glue the cap back on and reinstall.
I recently did this with a special size speaker in my car for which the
dealer wanted $125. It has worked perfectly ever since.
Bert Christensen, Toronto, Ontario
Carlsbro Powertone repair.
Due to dirt in use or at manufacture?
Carlsboro 10 inch ,open circuit, so burrowed in to explore. On the phenolic
cylinder that is the former for the voice coil . 4 pairs of scored
ines( stand out white against the amber colour of the phenolic). Each pair
about 6 to 7mm apart and arranged pairwise diametrically.
I suspect 4 pieces of sharp edged metal shim used in the original cone
setting and scored on removal. All the lines go axially , fully from one end
to the other , so if made in use would require the diaphragm (spider?) being
driven 10 mm into the magnet housing. Apart from the nearly symetrical
distribution of the lines.
the lines are on the smooth internal surface that glides over the central
section of the magnet, not the coil surface.
I doubt the lines are anything to do with the failure, that is well outside
the coil area. Probably due to stress on epoxy curing on a supposed stress
relieving bend of the coil runout wire inside a fillet ring of epoxy where
the cone meets the phenolic cylinder and before the join with the pigtail,
so repairable.
There is no overheating , scoring or any damage to the coil or elesewhere
just these lines.
http://home.graffiti.net/diverse:graffiti.net/voice_coil.jpg
The woven and corrugated yellow part I've
labelled purple "S" is called the spider. The cone is to the other side of
it.
"L" is the lead out of the coil and "G" is some sort of optical guide laid
in the layup, on the manderel, of the phenolic for placing the lead-outs to
then meet up with the pigtails at the cone. Moire fringing is where the coil
is. A second sight guide and second of a pair score line is part in shadow
off to the upper right.
There is a third and fourth pair of lines diametrically opposite these 2
pairs
If it was scoring from expandable/contractable mandrel or a chuck of some
sort I'd expect it to be engineered and pairs of lines exactly 6mm or
something precise apart, these are about 6 to 8 mm apart and some lines have
a nearby accompanying line. They are white as in scoring not grooves set in
at moulding . Or more likely no marks as what is the point if the process
leaves such serious imperfections where you don't want them.
Any bits of swarf or grit, causing lines in service, would be only
half the length of these lines. They extend the whole axial length of the
coil former, into the dome space.
Voice coil data 45 turns, 2 layer, so 90 turns, so no over or underlap problem
with the tails. layer 12mm wide, overal 46.1mm diam , including 0.1mm
phenolic , wire layers 0.54 - 0.1mm thick
Removed the dome and heated off cone and spider joins. For removing either cone or
spider if using hot air. Necause of the heatsinking of the basket mask of the cone or
spider with curved insulated material to protect the corrugations etc from distorting
permanently from the applied heat
Break in the wire going from the pigtail to the voicecoil tail , inside the
ring of epoxy joining the spider to the voicecoil.
Bridged a repair and re-coned as above but this time hot-melt glued
a nylon pcb spacer at each mount hole , to give a tapered
sliding, but finally well aligned fit to the basket rim, removed
after contact gluing.
Clear out any (non magnetic only ?) material from the VC magnet slot with a piece of brass
wide+thick enough and straight sided, requiring to flex in the middle and so scrape
both faces of th eslot. Blow out with air duster aerosol with a short length of spaghetti tube
added at the end of delivery tube
Before reconing put about 1/2 inch of doming into the spider as its easier
to do in free space than after the gluing process. Prop out the space between the cone
and the spider to give about 5/8 of doming and heat with hot air to give a cold set of about half an inch
For dropping the cone and spider (contact glued) use narrow pieces of credit
card is usually about right to deform the VC former enough but not escessive to
hold the VC section into the magnet while the glue goes off.
Refixing the cloth/filter dome , use hotmelt string and then run some black ink admixed in runny
glue around the hotmelt in the hollow, to give a better looking finish.
Making a UK square pin plug protector.
For protecting other vulnerable kit in transport , if
squashed pins first , into it.
Find an old plug , wrap plumbers PTFE around pins
and the base plastic of the plug. Then a number of turns of PTFE
tight around all 3 pins pre-heat with hot air and fill the central area with
low melt , soft form hotmelt glue
High power combos that go intermittant
after a period of use. If they use
an elbow jack on the amp to speaker link ,
replace with conventional.
Check the internal construction and if
poor mechanical connection at the elbow means
a resistance and voltage drop, heating the plastic
disc that is all that forces a mechanical connection,
so progressively worsens.
When cold pliers may turn the spindle part but
when heated by current , can turn by use of fingers.
For such a plug that is not too bad, cut a couple of flexible
washers to place under the soldering to the central
pole, in case the following depresses into the casing.
Place a dense rubber pad like a tap washer over
the pin and clamp the cover over the top to
compress down on the central pole.
Elmwood thermal switches.
You won't be able to change the switching temperature
but you can change the function.
ie normally open to normally closed or vice versa.
The metal cylinder part is swagged over a lip on
the bakelite cylinder.
Grind into this swaging on both sides just to break the
grip. Prize back one half of the swaging and separate the two,
beware of small connecting pin dropping out.
Then prize away the locating disc structure.
This exposes the bi-metal dome disc that does the positive
snap action . Simply invert the dome , with the
dome located in the locator part, and replace the heated
end-plate section, re-assemble the bakelite section
and coble together something to wrap around the
swaging part to hold back in place. Dome towards
the switch is cold off, dome away then cold on.
Tried converting some 16V froststats to higher
temperature set points but failure. Grinding
diametric cuts on the concave side has no effect
G-V, USA, thermal switches
Old type, linear bimetal, not snap action
dome, can be changed slightly by cutting the epoxy
covering to the exposed adjustment screw and adjusting
by wiring up to meter and placing in a polythene bag in a heated
can of water with a thermometer.
The action can be reversed from normally closed
to normally open but not at the same temperature.
Desolder the can at the juncture. Undo the
adjustment screw so no longer in contact, bend one of the contact
arms towards the wiring end.
15 thou gap in the contacts gave 50 deg C going s/c
and 46 deg C o/c on cooling for what was originally 100 degC
normally closed.
Opening gap to 26 thou and switching temp was >100
deg C so not very deterministic. Reducing to 18 thou was
70 to 75 degrees.
For 20 degree C ones
Beware the arm with the glass bead is not poitively
held in place and tiny spring under. The glass bead is the
electrical isolation. To change the action bend the pin with the
glass bead nearer the centre and back to the bimetal end
to engage on the nearest contact arm rather than through
the hole. Deglue the adjustment screw, remove and grind back
the ceramic plufg a mm and add a 2.5mm glass bead over, by placing
under the contact arm and reintrooducing the adjuster.
Could get a grat range of adjustment temperatiure in the
opposite switching polarity but the full range from 20 to
over 100 deg C was only about half a turn of the adjuster
so difficult to set.
Oscilloscope Y Amp problems.
For dual channel scopes where there is a problem with one
channel only. Compare DC levels and signals between
good and bad amps like stereo amp problems where one channel
has failed.
Bad pots due to bad wiper contacts rather than worn track
Instead of retensioning the sprung action of conductive or resistive wipers ,
perhaps a half-mm cut circle of material placed between paxolin and
die cast . To avoid parts of th ewiper disc touching the end of the central
soldering tag , grind back the inner end of that riveted solder tag.
For PbF soldering work, wipe off the solder before cooling down , to reduce
the etching errosion on th esoldering iron metal by the acidic flux.
Festoon bulbs.
Difficult to find these days for old tuner amp
dial scales etc. If there is space available then
convert high wattage MES screw bulb.
Assuming 1 1/4 in barrel fuse type. Break the glass
of the original or 1 1/4 inch fuse. Solder one end piece
radially to the screw part of the MES. Solder a piece
of silicone or ptfe covered wire to the nib of the MES
and the other end cap to the other end of wire.
Mount the bulb in the lower yoke if vertically mounted.
Replacement LCD
unobtanium
Zebra is unlikely to match in dimensions , same with pinning not going to
match but has anyone successfully wired in (or whatever) via conductive
epoxy (or whatever) onto the lands of a totally different display and
soldered to the pcb. Anunciators may not be a match either
At least the sequencing of segments is
fairly consistent.
Fluke 77 , used for unpowered/cold checks. I managed to blow up my
work-a-day sacrificial el-cheapo no-name DVM a couple of weeks back putting
2000 V on the 1000V range. Not dumped , as the large LCD , for the Fluke.
Just tried the display on 50 Hz sig gen and straightforward segment pinning
(all segments ok) , I'd have to use the hFE anunciator perhaps as "2" mid
segment for 2.999 Fluke use as this is only 1.999 max. Land spacing 1.2mm so
easy staggered conductive epoxying of fine wires. Loads of other anunciators
not used on the original like nF,uF, deg C etc I did not know were there.
Conductive epoxy is all very nice if you use it regularly but its gone off
if rarely used. Conductive hot-melt is good enough for LCD use, very low current,
hundreds of ohms or kohms.
Run some graphite powder along the lands, clean away from the non coated parts
with a cocktail stick. Then small dots of hotmelt precharged/mixed with
graphite but only just retain a gluing function, ie as conductive
as possible. Then melt in prepared copper wire
one by one , later. I tried one of these joins and the 0.05mm diam wire
broke before the joint broke. Then a run of decent hotmelt glue along the
completed joins, after checking electrical functionality with a sig gen .
Patch leads for prototype/test bed
Lost most of the leads with .5mm pins at the end engaging with the
.5mm sockets. 20 thou/ 0.5mm enamelled wire with the ends stripped
back works just as well if careful.
Cleaning nicotine off kit
Use aerosol oven cleaner , test on a small patch first especially for fastness of
lettering/legends/plastics softening. For knobs or cables place in a tray and let the
spray foam up. Wash off residue with methylated spirits and polish up
with furniture polish.
Festoon lamps
Barrel shaped lamps about 1 1/4 inch fuse-size often difficult to find replacements.
The barrels of christmas tree lights are about the same size and come in
a range of voltages, scrape off any varnish. Hacksaw/cut/melt away the plastic housing and
extend one of the wires to make axial.
Coloured lamps
Coat with coloured nail varnish or household varnish mixed with
suitable dyestuff such as artist's oil paint from tubes.
Surface mount PbF device coding
ST IC maker and Panasonic surface mount Al electrolytics are both coded for PbF compliance with a small dot or small square after or under the product number , is this common with other makers, the microdot ?
also ON Semi use such marks
and Renesas
http://www.renesas.eu/products/lead/specific_info/el/opto_rfmicrowave/index.jsp
Halogen filament lamp
Eurosonic 80V, G80 , 240V , outer envelope not
vacuumed
Osram 64480 , 240V, E27/ES 250W,
outer envelope not vacuumed either
Present to avoid touching the mainenvelopes
Awkward power tranny to heatsink spring clip
How to remove and replace or even initially place
(without possibly straining the legs of the tranny by lateral forces) such
spring clips as in this 2 angle view
heatsink and spring clip
I slid a thin piece of PTFE sheet between body of tranny and the clip ,
pulled outwards with thin nosed pliers, and then drove the clip along the
slot in the aluminium heatsink, with a punch and hammer to undo, but how to
reassemble. I've slid the clip along the slot (slot profile shows just under
the red "S" on the other heat sink) but not replaced over the tranny for
the pic. It requires pulling and sliding at the same time
The one pictured has space in front to manipulate with perhaps a lever with
2 pins do the double operation of pull in one direction and push
transversely at the same time but its complement is hidden behind some large
caps, so not possible with that one.
Its not possible to just push the top of the clip into the slot as is often
the case with other such spring clips.
The best I can think of so far for clipping or unclipping.
Grease in the slot and a small wedge to the thickness of the transistor laid
to the side of the transistor and a thin covering of PTFA sheet over the
wedge and transistor and lever or push the spring clip
across.
Email reply from the amp maker's engineer
"As to the spring clips, there is no real way of removing and refitting
those, except by sliding them on to the heatsink slots. That can only be
done when loose (no devices
in place ).
Hence, they have to be mounted on to the heatsinks before sliding
them over the devices."
My bit of (clothes line peg) wedge and ptfe sheet method did work but if the
applied force along the slot, is not axial to it then the high-C steel clips
easily dig into the aluminium and jam fast. I found a large pair of
engineers cramps would gradually inch it across, taking up the slack every
few mm , and starting again. Just another thought, with a pair of large
sewing thimbles on opposing finger/thumb you may be able to use enough
finger pressure to slide the clip up the wedge.
But otherwise matter of desoldering the power devices and removing the
heatsink with trannies and then the trannies can be easily slid out from
under the springs.
For replacing. Cut in half a length of 6.2mm across flats hex pcb
standoff. Grind a bit of slope on one side of each may assist,
or twisting into place with pliers.
While pulling or levering out each spring, slide one
of the bits of rod into the curved area of spring. Split
hex to give enough space for transistor heatsink so the
spring can come down on the body when they are removed.
With a temporary long bolt screwed in place of final one for location only,
screw the heatsink in place with one and then replace the long one,
before removing the bits of hex.
Fudge to give a bit more life to "scratchy" slider pots without opening up the kit
Indroduce mixture of silicon grease and graphite powder through the front
access slot. Use a hypodermic syringe without needle ,fit a length of small
diameter heatshrink or other thin walled tubing to get the mix down on the
pot track.
Using a digital camera for recording circuit details etc
Using a camera without 'Macro' facility make up a crude mount
to locate another lens over the original lens as a close-up
supplementary lens to focus in closer.
Larger heatshrink diameter required than the layflat
tubing available.
Varies with formulation of the heatshrink.
Very limited final width for this and a pair of diametrically opposite
spout shaped "ears" that will likely not shrink , so not ideal solution.
Say the layflat heatshrink you have then
maximum diameter as it stands is about 44mm.
The final width is limited to about 20mm of
which only 10mm all round will be fully tensioned,
but diameter of about 90mm max. This
is the maximum, smaller than 90mm will
give better final width by choosing smaller ellipse
but still very limited.
With string, pen and 2 drawing pins do the
draw an elipse on paper thing.
Fold in half longways and lay long "diameter" along
the edge of the tubing. So half minor "diameter"
of 35mm and long diameter of 110 mm mark and cut the
tubing with the elipse as a template. Trim up the
remainder of the tubing to give 2 elipses about 35mm apart and
a rough ring of layflat when the residual fold on the
other side is cut. Place the ring around the object
and warm with hot air avoiding the loose part
doubling back on itself rather than towards the object.
Removing minimal C-clip/ circlips
The type that recess into a groove without any extensions or gaps to get a
dart point under, as found on pot and switch bushes
Grind a slot at the closed end of the clip into the stem enough to see
colour
change, but avoiding grinding into the circlip.
Then a dart point to get purchase in there.
Made a tool from an old worn out pair of end snips , grind a ring into one
cutting edge and reduce the thickness at that area to allow getting into a slot
and the other cutting edge against the stem . Don't know if this tool
will work , will have to wait for the next opportunity but the first method does work
Extending a pot shaft
Assuming enough room for a short length of sleeve to cover
the join. Cut a slot in existing and a slot in a piece
of salvaged pot shaft and find a piece of cable tie or something
to fill the slots. Extend marks down the rods to mark the
slot posistions . Dremmel grind off the knurled part of an
F connector if right inside dimension. Swathe epoxy over one slot and
introduce the bit of nylon , push into the
sleeve half way, epoxy on the other part and squash in , turning
to check it is located.
Source of Woods metal
Pillar type ceramic and wire-wound resistor with the spring that breaks contact
if higher than normal service temperature but less than tin/lead solder temp.
Apply a low temp soldering iron to the Woods-solder blob. Or repair by clamping closed and
low-temp resolder back into place
How to salvage SMD LEDs from heatsinked surface?
Closely packed slivers soldered (nearly) directly onto aluminium.
Place on a hotplate at what temp and then what?
If ptfe or similar interlayer under the traces then perhaps shearing LEDs with traces off the Al, but what if
aluminium oxide?
Calibrating electronic keyboards.
For a 5 octave keyboard and counting the "white" keys
only the leftmost is probably C then keys number 7
and 14 are C also, 14 is middle C and middle A is the
fifth key above that.
Middle A reading 440.000 +/-
a little on a crystal controlled frequency meter then middle C should read
261.625 +/- a little. If the waveform of the keyboard is not
suitable for the counter then sum the keyboard and isolated
audio generator together and listen on phones
for minimum beats and measure the f of the generator
on the counter.
Amp and speaker - soak test.
Without tying up a signal generator and minimising audible intrusion
into the work shop. Starting with a basic cheapo microphone . Make an in-line
adaptor with just something like 100nF and 3 ohm in series across the cable
as a crude filter for the mains hash.
Plug in-line and place the mic near as possible to the mains transformer and
cover the speaker with old sleeping bags, cushions etc. Low f hum is not too disturbing
compared to 400Hz or 1KHz and gives a reasonable work out for the ears being less
responsive there.
Desoldering the likes of close-pinned switches and not wishing to use hot-air for closeness
of SMD/fine traces, Add solder with a soldering iron to form a net/puddle touching all switches, while
pulling from the other side.
Converting the likes of French Secme small rotary switches from 2 pole 3 position detented to
2 posistion detented, the outer pair.
Small blade between arm and body lid to prize off. With the blade still in place,
turn upside down so the tiny spring-loaded contacts stay in their wells. a dot of
silicone grease helps in holding these.
Remove the detent plastic form ( of 3 connected Vs for the spring loaded pawl to swing into)
Meld a blob of hotmelt glue in the cental section to give a smooth face
between the outer Vs. Reassemble and glue the end of the lid away from the pair of
catches at the protruding arm end.
Variant for 4 pole. Grind of the ledge that receives the lid and the axial nib on the
rotor that engages in there. Glue the 2 rotors together. Assemble both rotors in one cover
and while holding against the pawl, slide the other cover over and lightly clamp
in place. Check contacts and wiring as not symmetrical etc. Glue the 2 halves with
hotmelt. Make op wire tails to go to pcb.
XLR connectors , no name seen
3 grub screws, one for active end and 2 for cable grip. The single one screw inwards
to release the pin end. Try and slacken the other grubs , normal undoing, and
leave in place. Don't loose the 2 part cylinder metal collars under these grubs as awkward
to replace even without a cable through the centre
Refitting a daughter board.
Where there are isolated bladed copper pins fitted edgewise and soldered
perpendiculer into a line of holes in the main pcb. Easy to remove but
a real pain trying to refit when surrounded by close fitting other stuff.
There is no matrix structure to align the pins with sufficient accuracy
and no room to tweak posistions with a small blade.
With soldering iron clean up any blobs off the pins, and open out the
main pcb solder pad holes with a darts point. Dremmel with cone cintrided
bit to open out the opposite side of the board to make a bit conical.
Disc in dremmel and grind off any remnant solder blobs and grind chamfers on
the ends of the pins to make a bit more pointlike.
Align the pins visually and then if possible via a same spacing proper
connector or try inserting on the solder side as a template.
If still will not align , do not force, note which pins are out
from viewing through the holes and repositioning. Still jamming ? try some
engineer's blue or permanent black felt tip pen along the line of holes
for telltale mark.
Dented central dome to speaker cone.
I've not found the ideal solution yet.
Any tame car panel-beaters out there ?.
You know the ones. A large angular dent in a car body panel and you hand
over some cash and they say turn round a second/ walk round the block. Then
they kick the panel, but they know exactly which spot to kick.
Working speaker but the large perforation-type front grill kicked in or
dropped so it touched the cosmetic dome at the centre of the cone leaving a
number of depressions.
I tried heating with a hot air gun to maybe soften and sucking with a vacuum
cleaner hose - no good.
Tried some dabs of hot-melt in the dents, alowing to cool and pulling in
conjunction with 1 pound weight in some undeformed areas re-created the dome
and then lightly heated with hot air to remove the glue - but didn't cleanly
release and had to dust with toner powder to matt it out - but otherwise a
re-formed dome. Anyone been here before with better ideas. ?
Weights and vacuum cleaner ? Funnel covering all or most
of dome and vacuum ?
Cutting small slots in pcb
Where there is a different footprint for a replacement item and you have to
pierce the pcb, in slightly different positions to the original, to push
pins through.
In actual case ultra-miniature pcb mount toggle switch with thick
pins, not bendable, to go on a populated board. Footprint of 6 pins on
slightly larger , in terms of centre spacings than the original, so cannot ,
without making a jig , drill new holes. The drill would drop into the
original hole. So a matter of short radial slots out to the replacement
positions. Enlarging the existing holes would require filling with glue or
something for structural integrity , after soldering.
Use a small drill bit in a dremmel and use the fluted part
of the drill but its more melting by friction than cutting. I tried grinding
notches around a sewing needle but that did not work.
Dental burrs look like the tool of choise for this .
Modding with a toggle switch in a case with insufficient space , so protruding
through the casing and bush nut not holding to the case .
Cut rectangle in case to take the sw body. A pair of large solder tags bent into
joggled Z shape and fitted over the bush either side and nutted down.
2 small nuts and bolts either side through the casing to hold in place.
PTFE string
For tying hot components together enough to stop
any vibration building up eg lines of on-end
emitter resistors.
Start with the thick formulation of plumber's
PTFE tape and twist a cut length and then
stretch it. Not brilliant for tying purposes
as it can still stretch but if the force in
tying is not too great then at least better than nothing.
Maybe if only the thin type then cut 3 lengths ,
separately twist and then counter twist all 3 together and
stretch.
Testing combo amps
Beware if testing with the amp in the cab but
not all retaining screws in place and tightened then
a rattley noise can be from the captive nuts rattling
in the chassis. For general idea of bass
response put a microphone in the input and the
mike near the mains transformer for mains hum.
It is a common failing of combo amps due to long leaded
resistors or capacitors ,usually bulky ones, to resonate
and flex in sympathy with some speaker frequency/power.
If the lead is high copper content then it work hardens
and fractures, usually at or in the board. Replace with
a larger diameter pin , or remount with a ceremic
bead and a button of that orange silicone rubber salvaged
from the output pressure roller opposite the fuser roller
of a photocopier to take the temperature and
damp any vibration.
For testing speakers at power and not to inconvenience yourself or neighbours.
Choose a very low frequency like 70Hz with speaker face down on carpet and sleeping bags
or similar around the box.
Soldering station mod
Where there is a large spring arrangement supporting the
soldering-iron. Surround the spring with a sheet of
expanded metal wire-tied at the rear. It avoids that
all too common problem of unknowingly draping a lead
into the spring and onto the heated element.
Digital camera micro-fiche printing
Assuming the exposure level of your camera goes low enough
it is possible to photograph micro-fiche reader screens and then print
out via pc, use some sort of steady camera mount eg rubber
footed "trivet", like aerial reconaisance photo veiwers.
Toroidal transformers
Needed a replacement doughnut shaped transformer to replace a blown one.
One i had available had been epoxy sealed in the core with screwed inserts for mounting
purposes. The one i required needed to be plain hollow core. The epoxy fill
(at least in this one) was heavily bulked out with chalk or other bulking agent
to reduce cost and was easily "drilled" out sufficient to give clearance
for the original mounting bolt.
Converting one contact on a standart 1/4 inch jack socket to isolated switch action.
Remove the movong contact and slide a squashed Hama bead over the
dimple section. Cut the plastic divider walls of the plastic frame just in this central
section to still block the contact moving on jack insertion and also stop
the bead from sliding out of position.
Oriental script rubber stamped onto pcb
Roundel stamp on the [ script on top and bottom
sections and 3 numbers across the middle eg 86 12 15
does not mean 1986, Dec 15
I was exploring use of polyswitch / reset fuse MF-R110 , 5mm 1.1 amp hold
current in its PTC thermal properties to lay on the outside added in series
with a solenoid as a protector. In olden days of bulky VCRs there was 2 coils , the pull-in
and the hold, to avoid heat build up.
Anyway data for this particular type of small polyswitch , as I can see
being useful in other non mains fuse situations.
20 to 42 deg C, 0.2 ohm
66 deg , .3
92 , .4
100, .45
108 , .5
118 , .7
122, 1
123, 2.5
126 deg C, 11 ohms
then goes shooting off
Polyswitch voltage rating
Hold current (marking divided by 100 usually) is roughly proportional to area and open circuit voltage
is roughly proportional to thickness (including wires)
1.5mm , 25 volts
1.7mm , 30V
3mm , 60V
3.8mm , 120V
5.1mm, 120V
5.8mm, 240V
Testing for RoHS/PbF solder
LTSIT (Low Temperature Soldering Iron Test)
Using a never used reserve thermocouple monitored variable temp OK
soldering iron set up for a tester.
185C/365F for SnPb and 217C/422F for production PbF seems about the
temperatures. Olive oil in a heated bath (with flammability precautions in
place) will go up to 210 deg C without smoking or boiling.
I calibrated the iron tip in an oil bath with a 250 deg C glass
thermometer, to a known 200 deg C with the heater LED slow intermittent.
Tried distinguishing known 60/40 leaded solder and known silver solder
95.5/4/.5 and had to drop the set point down to 185 C to melt leaded solder
wire on the tip and not melt silver solder wire. More than just the test
part of the tip in the oil so perhaps explains the lower set point. Swathed
the tip with tallow-looking conventional solder flux over the tip to assist
action. So distinguishing Pb/Sn and production PbF should be more
straightforward with this "test iron" . Testing on IC/small transistor
pad/joints (least heatsinking) and then by inference the same solder used in
the usual suspect
areas, ie larger pads, larger leads but PbF not up to the job.
3 more physical tests.
Grey mark on paper.
Scrape back surface of the solder and rub a specific number of times
and force, with
some copier paper over a cocktail stick. Leaded solder leaves a much darker
grey mark, nearer black, on the paper.
Admixing molten leaded solder into lead-free solder and on cooling the result will
solidify much more suddenly than for leaded solder of same size and the result
will be a white/grey crystalline looking appearance although clear silvery finish initially.
Indentation test
The following using a well worn automatic centre punch, so a new sharper one
for use only on soft metals is probably called for. This one, existing
spring replaced with a lighter one giving a load before trigger of 3.5Kg.
Comparing block of copper,Al, roofing lead and off the roll solder
wire,63/37 and 85.5/4/.5 silver solder laid over the lead as a soft anvil.
Steel rule with 1/100 inch markings and a x30 basic microscope
Measuring diameters of the indentations (x10 thou/mil)
Cu 1.5
Al 2.5
high tin PbF solder 3
SnPb 4
Pb 5
Had to decide whether a 2003 board had failed solder due to SnPb
or PbF and excess heat , where it was used.
Could not decide by appearance,
good mirror finish, lack of pastiness but solder joints too shallow to tell
domed from conical, so probably SnPb. If a ring-crack or "ravine" crevice is obseved, under 30x microscope,
then probably PbF.
Low temp soldering iron test, melted - SnPb
Paper test , decidedly black - SnPb
and indentation test much nearer Pb diameter than Al so - SnPb.
As I've not got a separate centre punch yet and swapping springs for this
test
I have to check with a lump of aluminium and a lump of lead
to calibrate each time.
Had not developed the chemical test at that stage.
Chemical test
Got some spirit of salts (32 percent hydrochloric acid) from a traditional
hardware shop. (A poison's license is now required , it seems , for selling HCL in the
UK these days. No colour reaction found heated with leaded solder but
on cooling a white deposit would suggest lead chloride and then
Potassium Iodide KI added, now seems a number of repeated heating/cooling
cycles is required.
I increased sample sizes to about 3cc of 32% HCl and about 30 cu-mm of
solder wire. About 1/3 of the wire scraped with a razor blade into
scrapings and remainder
added as round and the part round remnant . NB BEWARE when boiling the
hydrochloric acid , point
the test tube away from you, perhaps a loose plug of cotton wool in the
mouth of the tube, only just holding in the tube, not compacted in.
Use holding tongs to keep the emerging vapour away
from your fingers. Plenty of ventillation or preferably fume cupboard or outdoors.
Especially important on re-heatings as due to lack of nucleation points , or
whatever the reason,
it does not slightly boil first like a kettle but can erupt without warning
, so only gentle slow warming.
After boiling and cooling twice
then perhaps about 30 cu-mm of KI added and a couple of repeated boiling and
cooling. For the leaded one bright orange crystals? soon appear on forced
cooling and flecks of glistening gold colour the second time of heating
cooling after KI added . Cor, I've managed to transmutate base metal
into gold. The glistening gold agrees with my chemistry book
for lead testing with KI, don't know about the orange. The colours and crystals
disappear on boiling.
The lead free one , no colours at all in the liquid but the metal goes
black (same with leaded sample but can only be seen when boiled
and clear of precipitate). With repeated boiling then still a lot of gas
comes off the metal for
some time after removing from the heat , unlike the leaded sample. Maybe
acting on the 5 percent silver content.
The KI came from a kids chemistry set in a charity shop. One way around kids
and chemistry and product liability, absolutely no name. Nothing on the box
and nothing in the accompanying book for makers name or even country of
origin. Another later kit I picked up was named "Discovery World" chemistry lab.
Looks as though regular flicking of the test tube is important.
Repeated samples and again nothing appearing in the non-lead sample. The odd
flecks that would appear when shaken were probably reduced flakes of the
original scrapings, again black colour. Looks as though 30 cu-mm is about
the right amount of KI with 30 cu-mm of solder and initially 3cc of HCl. I
can only estimate using a small spatula that is in fact a stainless steel
lobster pick, fork+spoon. The 4mm wide spoon end is ideal for this. No
orange colour this time (initially) . Also useful for cleaning any crud
from the inside of test tubes as fairly long, spoon bit first
and then fork end if really stubborn. Once a very slight yellow tinge to the
liquid appears and at boiling and through cooling , much flicking of the
tube with a finger, then instead of flecks that look like golden flakes of
skin you get a dense mass of more like cream-coloured or
sulphur dust colour soap flakes or fern/fan shaped or matted yellow hair looking
like kevlar fibres. Reheat
and all this dissolves well before boiling point. Allow to cool untouched
and then just a small scattering of fine gold-coloured flecks when you flick
the tube. The orange colour seems to only appear after repeated heating and
cooling or over time, the second SnPb sample is now starting to show this orange colour
after 5 or 6 heat/cooling cycles and increasing each time.
Second sample of PbF shows no colouration or precipitate, again , so
seems repeatable and differentiable. Left the PbF test tube laying around
and after about a week the solution was quite red-orange and some orange
crystals.
Tin Iodide/Stannic Iodide is red-orange and so that delayed colour in the
SnPb samples also, is probably indicative of the tin content.
Worked quite well , a sample tube , 45mm long,on a scanner bed, required
disturbing just before the beam passed under. General orange background
colouration due to the tin iodide and the "gold" scintillating flecks from
the lead iodide
Potassium dichromate after HCl treatment of SnPb solder gives a dense green
colour of chromium chloride and a non-indicative white precipitate.
Repeated a few weeks later with some solder from a 2006 amp covered in RoHS
and PbF stickers. No gold flecks or yellow or orange colours the first day just non
glistning flecks and bits
of pcb lacquer scraped off with the solder. Second day very light tint of
yellow becoming orange and then
orange-red over the next week with time and odd tube shaking, just
indicating presence of tin and no lead.
Physical tests on the board, LTSIT on a 2nF, 100V cap with 2mm diam pad, 1mm
wide trace and 0.5mm pin , so low heat capacity.
First pin liberally covered in flux, took 5 seconds of heating before
melting and immediately , 0.5sec,
greyed over on removing iron. The other pin , no flux, it would not melt.
Paper test , very light grey and indentation test on 1/4 inch socket pin
joints , so chunky solder of about 3mm diameter gave 2.5 units compared to 2units for Al
and 5units for lead sheet.
Redoing a PbF solder joint with leaded solder at leaded solder temperature, the resulting joint
can be more likely to be whitish compared to the original and "flash" over solid quickly rather than
gradually.
Yamaha started using PbF about 2001 and Marshall Amps (UK)
maybe 2003 (before 2006 there was no requirement for Pbf
or RoHS stamps or stickers). Orange band amps (UK) of (early? pre-july) 2006 were using PbF
but no mention on pcb or chassis stickers.
Sony at least 2004 (HCD NE3) in manual
referred to as unleaded solder and "leadfree mark (LF) "
Confusing PbF viewing test appearances. With pbf solder joints on green finish pcb
and viewing pins under x30 microscope. Perhaps an optical effect from the curvature of the solder blobs
being concave rather than convex makes
it appear as though there are green rings around the pins as though failed
solder and can see the underlying board through a solder ring-crack. As viewing pin end on it is all a bit iffy.
To convince yourself it is an optical effect , surround the pin ,covering the green board but not the solder blob
with sticky paper labels of another colour and this green ring turns to the colour of the paper.
If there is a reverse R U/ UL logo on the overlay of the pcb and an adjascent six digit E number E......
put that number in the search box of UL http://database.ul.com to obtain the pcb maker.
Then number under E number is likely the pcb sub-class giving the temperature v dwell time
soldering classification of the board material. If 260 degrees C for 10 seconds then inteneded for lower temp
leaded solder use. Unless anyone knows for sure then 270 deg- 10 second for PbF use and
288 deg- 8 second is probably for higher spec boards like flexible polyimide/ N7000-1 /Pyralux.
eg http://www2.dupont.com/Pyralux/en_US/assets/downloads/pdf/APclad_H-73241.pdf
Solder float peel strength: (no change after 288C/10 sec) eg
http://www3.uic.com/wcms/images2.nsf/(GraphicLib)/2006_PCB_Damage_Test_Plan.pdf/$File/2006_PCB_Damage_Test_Plan.pdf
Peel Strength of Metallic Clad Laminate at Elevated Temperature
and http://www.ipc.org/4.0_Knowledge/4.1_Standards/test/2.4.8.3a.pdf
On a recent "American" board , made in China, so no warning legends of PbF,
but PbF soldering used nevertheless .
Soldermask, the sort of conformal coating final process at
the pcb production phase is a staining coat , usually green these days.
White rings showing around the solder pads after soldering may show elevated
soldering temperature has been used or wrong composite material body ,
showing rings of plain white polyester/epoxy+fibre board . The green staining
having melded into the plastic or evaporated.
From UL 6 digit E number and adjscent board type number this is designated 260 deg C / 10
second solder dwell ( for conventional soldering) rather than 270 deg / 10
second dwell of proper made for PbF pcb boards.
Basic FR-4 class of pcb is not compatible with PbF solder. On first exploring a piece of kit with
suspected PbF soldering and an intermittant fault. Use a bird feather to make the lightest of
touches as a twizzle stick, as it is too easy to mechanically "remake" a solder joint using a plastic pen
barrel and so hide the problem.
Storing salvaged pcb boards / cards
Random shapes and sizes so difficult boxing up.
String steel wires near the ceiling
of the store, tensioned with turn-buckles/rigging screws (otherwise unused space). Then a
plastic curtain hook hot-melt glued to corner of each board, on a weekly or monthly batch
basis, then strung up. Timewise order to the boards , so could be
cross-referenced to repair job log so no logging of the boards as such.
DVD/CD platter widget
Bit of plastic ring with 3 internal springs and wedges that grips the disc
but comes off the metal spindle with the CD. Reminds me
of those ex-juke box 45rpm singles with adaptor for home use.
I tend to find superglue is some sort of super-fluid , almost totally
lacking in viscosity and migrates along interference fits rather too easily.
As occuring in a laptop drive, the bearing would be only just below the
platter. Ended up with drop of superglue and capilliary action and kept the platter spinning
for an hour with a small motor and O ring over plastic drive pulley. Didn't
like the idea of playing CD for that time as not sure what vapours would
come off in an enclosed space
For introducing hotmelt glue into confined space
Silicone tubing to stretch overe the nozzle, ring of PTFE to go over tube and nozzle
with 2 holes to wire tight to the rear of the glue gun. Or perhaps just holding the wire
so the modification is easily separateable. So while cooling down , leave the glue
in the tube to go solid to make introducing the tube easier next time and then heat with
hot air before adding the glue gun to the tube
Insulated 1/4 inch elbow connector, pseudo hot moulded connector.
starting from normal straight. If mono form required, starting from stereo,
wrench the ring tag around in line wiht the sleeve tag and solder together.
Black plastic boot for chassis fuse holders etc , maybe opening up the cable
entry a bit, turned inside out so mandrel gloss finish on the inside and more rubber
looking matt surface on the outside.
Punch a 1/4 inch hole about half an inch from the open end of the boot.
Place over the cable and solder the wire to the tags, and clamp, with the
tags at right angles to the jack stem.
Force the stem of the jack through the punched hole and force over so so the hole
ends up in the recess part of the strem. Then with the hotmelt glue gun mod above
, fill up the boot from the cable end first. Withdraw the tube before the end
and fill up with plain glue gun nozzle. Heat the whole boot section with hot air while the glue gun
is hotting up . If the boot goes misshappen wrap some .5mm ptfe strip around , then rubber
band, or reheat the boot later on , and do this. Let the open end dish out and
paint with black felt tip pin to tone down.
Mangled 4 way phono sockets, white and red marked , often found on mixer panels for external input/output
With central pk screw and pins as standoffs to pcb and insulated from the front panel .
Pull out the mangled conductor pins
Grind back the rear of the affected quarter black plastic of the surrounding matrix to allow , after enlarging the
hole, fixing in a standard phono socket, and retaining nut under.
The surround of a chassis so. will just fit in the insulated ring of the black plastic
and original pin will stand off pcb and original fron sc lso still present
Then wires to pcb to replace the mangled standoff conductors
Overlay designations , USB failure & miscellanea
I thought I'd messed up the USB lead of my HP 1020 laserjet , measuring
voltages etc, trying to learn about USB function. Turned out I must have
strained a USB A to B adaptor and nothing wrong with the printer. Is one
rule of thumb (for a suspect USB connection) that a maximum USB insertion
force of 250 gram is too low and above 450 gram is generally good ? ( I
later went around a number of leads /connectors, adaptors with the kitchen
scales).
Anyway inside the printer there were 6 unmarked 2 land SMD lumps marked on
the overlay as E1 to E6 , is E a designation for fuse?, all were 0 ohms
across. There were 2 unmarked green 2 land lumps on the USB lines marked VR
on the overlay, bidirectional transient suppressors ?
and 2 SMD contacting the USB lines marked CR, presumably rectifiers, but can
anyone identify with more certainty
4 land device marked topmark D132
found on topcode listings
D13 AZZ23C8V2 Diode SOT23 dual zener 8.2V 0.3W, 3 pin
related?
3 land device marked WU1
found
WU BZX284-B4V3 Phi I SOD110 0.4W zener 4.3V E24 �2%, 2 pin
related ?
The "E" were not all the same physical size, one was quite large. Did not
try a probe on the central material but matt black , ie non metalic. If they
were in fact inductors what subclass ?, there were other items marked "L"
for inductors on the same board
TYPE NUMBER / MARKING CODE
PESD3V3S2UT / *U9
PESD5V2S2UT / *U1
PESD12VS2UT / *U2
PESD15VS2UT / *U3
PESD24VS2UT / *U4
Note
* = p : made in Hong Kong.
* = t : made in Malaysia.
* = W : made in China.
Removing and repalacing cable strain relief clamps
2 part, connected, black plastic.
To remove if the cable needs replacing.
Cut the lead inside and out leaving enough to grab with pliers to pull
out the cores , then the sleeve. Then push out the clamp.
To replace , mount with smaller side in a vice and compress fully, then engineer's cramp
over the wider pair to retain the compression while mounting in the chassis hole.
Band Amp jig for protecting valves
When working on a power amp outside of its case and of the normal
form with mains transformer at one end and output matching
transformer at the other. Usually leaves one edge exposed and can
easily catch an exposed output valve if the chassis rolls or
you, unseeing, rest it upended on something.
Assuming the valves don't extend too far.
Aluminium sheet about 20 inches by 5 inches. Bend
down the middle lengthways and place between the
transformers protecting the third corner.
Hold in place with a pair of large cable ties,
or doubled/trebled up smaller ones .
Preferably de-latchable cable ties or make delatchable
by extending the pauls by under-size drilling
and forcing in small nails.
Another simple aid to assist working on large valve amps
a stout cardboard tray from a grocer's shop,
stout enough to hold the inverted weight of a valve
amp while working inside.
Some intermittant problems in equipment are due to problems associated
with spikes coming down the mains line (eg fridge compressors switching on,
washing m/c spin motors cutting in ,arc-welding etc). Some equipment to check for such
susceptabilities . Large transformer or motor with an on-off switch not the proper
swept action mains switch. Problems with timer misfuction where the timing
is taken from mains frequency can be due to spikes from ordinary
room lighting dimmers producing extra spikes interpretted as extra mains cycles.
Takamisawa RY5W-K and probably similar compact sealed DPDT relays with 1A 24DC rated contacts
If contacts "welded" toether due to a one off cause. Cut off the end face farthest
from the coil terminals, that end pole piece lifts away from the pcb face when active ,
dislodge the stuck contact with a needle and seal up the cut face.
VCR record sound problems
Checking the 50KHz or so, 30V pk-pk level or so, of bias oscillator at the audio record head
is fine with a scope but the audio component is swamped. Use a crystal earpiece
the sound level would normally be enough to make out normal level conversation
on a TV channel signal input.
Soldering tip
For old components ICs, trannies etc with corroded pins/ leads. Scrape
with a piece of folded fine emery cloth or sand-paper to give a better key when soldering.
And for ICs use emery board nail files either side of each row of pins.
Reconditioning slide switches
Particularly the type of multiway slide switches used as wave change switches in
radios and play/record switches in tape units and function switches in other audio equipt.
Usually impossible to find a replacement
as although the external may look right the internal number of ways and interconnects
is almost certainly different. Especially with old dark brown paxolin boards desoldering
the complete switch often ends in a mess internally to the switch and
to the pcb.. Instead just prize off the metal covering to
expose the slideway. Firstly desolder or burr off the casing pins that go through the pcb. Usually
the bent lugs that grip under the paxolin board inside the switch are inaccessible but
they can usually be bent indirectly when levering off the cover with
only minor damage to the paxolin around the locating recesses.
If the ends of the switch are exposed introduce a screwdriver between the cover and
the slide bar to act as a lever forcing these retaining lugs back enough to release the cover.
Surprisingly the metal always (so far) bends rather than the internal paxolin splitting. If ends not
exposed then grind off part of an end or bend out to get access. After removing the cover bend
back these lugs in line with the sidecasing. Remove carefully so as not to dislodge the moving contacts
too much and note their positions as not always the same size in all positions.
Also beware of dedent spring and ball(s) flying out. If present then for reassembling
use a dab of hotmelt glue on (either) side to retain while assembling and then
with pointed soldering iron melt when reassembled to allow to spring into place if
the dedent has a slot in the metal casing.
Clean corrossion off the line of contacts and the slide contacts and replace
worn/broken contacts from breaking open another switch.
Cut along the length of one or two small nylon cable ties to make 1 or 2 strips of the
right width to slide these sliding contacts onto. Cut down enough to open up the
contact points but leave the nylon recessed enough to give some location when
reassembling. Position the contacts on the nylon to fit the wells in the slide bar of the
switch assuming an interconnecting slot between the wells.
Mix up a paste of graphite and silicon grease and put a dab in each recess in the
slide bar and introduce the line of contacts that are then held within the mix. Carefully invert this bar and
without forcing introduce over the fixed contacts and carefully slide out the nylon to
mate properly. Don't force as a contact may be misplaced. Temporarily fix in
place to turn over and check continuity between contacts. Temporarily replace the cover to fully check continuity
in all positions of the slide. Permanently replace the cover and solder or glue in place.
Lost all those thin bore nozzle extenders for aerosol spray cans ?
Use the plastic bit from a cotton bud.
If too large a diameter, partially melt and
stretch like glass blowing.
Fan inlet filter material.
For coarse filter , to prevent hair and metalic bits of foil or
wire filaments. Use 1 or more of those pads of matted
plastic fibres used for cooking pot scouring, reticulated foam .
Also in the kitchen the non-open-weave "J cloths"
the cheaper sort for fine filter cloth in conjunction
with the coarse one on the outside.
Estimating a likely value of a small low voltage polystyrene cap
that has no value printed on it or has melted due to being near a hot R
and foils shorted.
Ground down the ends of a few such caps , stripped the covering off
and unwrapping the foils. 2 foils per strip length L, width W
and separating film thickness d. The voltage rating is related to the value of d
120pF, 22 x 4.5 x .04 mm
220pF, 60 x 4 x .05 mm
680pF, 28 x 4.5 x .015 mm
1800pF, 200 x 5.5 x 0.03 mm
Averaging out gives an approximate fomula of
Capacity in pF approximately , dimensions in mm
C = 0.0487 x L x W / d
Some tips for repairing switch-mode power supplies.
For personal safety use a RCCD or ELCB ( trips out when there
is a leakage from supply to ground) which should of course be in line
to any repair shop work bench. Also a variac supply and a 1:1 fully
isolating transformer for working on
switch modes. Disconnected from their loads these s/m supplies will usually
kick in and maintain operation at half mains voltage,safer to work on and
also less stress on any overloaded components.
Unless it is absolutely necessary don't use a scope when checking /repairing
unknown s/m power supplies. To check whether the oscillator is driving the principle
transformer use a small "sniffer" a mH small choke connected to the lowest ac V range
of a DVM. Although not designed to monitor 40KHz - 50KHz signals it will register
a few millivolts if osc. operating and magnetically close coupled. This "sniffer" will also pick up
induced voltage from TV degausing coils for checking. For cold checking circuitry connected to the principle
transformer of a s/m supply use an ac inductance meter rather than resistance DVM to
distinguish coil inductance from "zero" inductance of shorted diodes,electrolytics etc.
White ink pen for marking info on black plastic IC bodies
I've not found the ideal solution yet - Staedler or Stanger
permanent ink felt tip pens with white ink yet.
In the UK gel pens by Mitsubishi Pencil Co are half way there.
The bright pink one is good colour contrast and will write fine lines on
black plastic. If you allow a day for it to dry then it is reasonably fast,
you have to rub it firmly before the dried gel will rub off.
Asda own brand metallic felt tip pens are contrasty to black.
Gold or silver , more permanent than gel, but you'll
have to sharpen the points with a razor blade for writing on ICs
Small scale vacuum forming machine.
From a de-solder vacuum pump , 2 oz tobacco tin,
polythene tube, rubber sheet and a hot air gun. From what i remember of
radiant heated sheet, vacuum forming machines, they could do with an adjunct
of hand assisted hot air because of cold spots or tight radii.
Trying to make a keypad covering as used in bars and restaurants
to keep crud off the keys
Tried doming out in the button positions some expanded ali sheet as a mould
, did a superb job of giving a diamond patterned surface of the plain sheet
and blisters formed but were not large enough or deep enough. Will have to
try step-repeat drilling out some metal sheet with larger holes than the
original front panel and some backing of expanded ali as an internal stop
face.
Tip for equipment used in schools/colleges/universities.
A slide projector kept blowing bulbs far quicker (perhaps within a half hour) than
should be the case. Class finished early in each case. Someone eventually noticed a student must have moved
the voltage selector switch from 240V to 210V . If he had set it on 110V it would
have been immediately noticed something grossly wrong. Once in a while there is a clever student.
Moral for
equipment permanently used in a 240V environment and in proximity with students
disable internally the movement of these switches.
Rough data for anyone making a contact type moisture content meter.
From a Tramex analogue meter.
3V pk-pk ( across basic 1:1 scope probe) sine, 12 KHz signal between
2 conductive pads. 3 scales: 1 Timber , 2 Felt roofing, 3 Plaster/brick
Resistors placed on some expanded polystyrene and
meter pads pushed against it
100M Ohm Scale 1 9%, 2 30%, 3 1%
10M 12%, 46%, 1%
1M 64%, >100, 2%
100K >100%, >100%, 38%
10K >100%, >100% , 50%
Scales 2 and 3 0 to 100%
Scale 1 (timber) same movement but marked <10 to 20%
reading 14(scale 1) corresponds to 30% (2&3)
16corresponds to 62%
18 " " 83%
Source of small storage containers.
Film processing shops usually throw out the small plastic tube pots that 35mm
films come in, use for storing components. Can also be used for in-line housings for filters,adaptors etc. Another
source of small cases is hospitals that throw out the plastic boxes that suture needles
come in.
Reconditioning old style open 1/4 inch jack sockets
Weakened metal on the U of these open sockets
so not making reliable contact.
Open out the U so the V tip of the contact is in line with
the V tip of a plug.
Tie tightly a cable tie around the curved section to reinforce.
No point in replacing
these with modern ones as will be weaker anyway.
Making up high wattage zeners.
Needed a 13V,5 watt zener. Had some 5.6V ,5W zeners so 2 of these in series with
2 1N4001 gave 13V at the required current.Beware of "different" polarities (band marks) though.
Testing loudspeakers.
Particularly for owners to check their speaker/speaker connections where
it is possible a short has blown the amp and they are non-technical and no
meters and you don't want a bouncing amp repair job.. With a charged 1.2V ni-cad
touch the 2 leads to each speaker to the nicad and you
should hear a thump from the speaker if OK. Also useful for checking
possible reversed polarity wiring to the speakers. Touching similar sense wires
to the ni-cad should pull in the cone in both cases or push out in both cases. If you
can't see the cone then thin paper over the grille should indicate the punch of air
or push a thin piece of wire up against the cone (don't hold tightly).
The standard polarity is that if short duration plus
DC is appled to red or plus terminal, relative to the other one, then the
cone will move outwards.
Making micro hooked test probes.
Spaghetti tubing about 1mm diameter, some 0.5mm heater nichrome wire.
With a leather punch cut some small plastic discs , 2 per probe.
Puncture with a needle to pass the wire but block the tubing.
Find some silicone rubber sleeving to act as spring. Form one end of the wire into
a loop for twisting and soldering hookup wire to. Feed on the silicone sleeving then a disc then the
spaghetti tube. With fingers compress the silicone so the end of the wire emerges, place
the second disc over and bend the end of the wire into a hook. A bit of suck it and see
to get the right lengths for the right amount of compression at the hook
Sacrificial power trannies for audio amp testing.
To save destroying expensive TOP3 package or even more expensive
widened 2 hole fixing "wide TOP3" trannies use a 2N3055 or 2N2955 (for pnp) adapted
when checking out a blown amp.
From a TO3 heatsink ,the type with the trannie sitting diagonally and turned up
cut vanes on each of the four sides hacksaw off the vanes and also saw a slot into
the 2 "B and E" holes. Solder silicone covered wires to B and E close to body and
file back surplus. Solder another wire to the case and mount using
the cut down heatsink as spacer and the usual usual insulators
to the heatsink of the amp under investigation ,just one hole fixing will do for testing
purposes. Incidentally a lot of the time (don't tell the hi-fi purists) pair of TIP3055
and TIP2955 will replace the rarer complimentary pairs of trannies for non critical
replacements. Perhaps with one-hole fixing only and skewed mounting.
For higher current (25A) there are TIP35C and TIP36C.
For TO220 package situations use TIP41C and TIP42C and
for higher current situations BD911 and BD912
Making a board extender.
Working on a piece of old digital equipment with numerous PCBs off the one
back plane. To monitor ICs had to make a board extender. Finding a double
sided card edge connector was easy enough but no "male" connector available for
the other end. If too many ways to the female connector plug the surplus ways
with a bit of blank board to prevent mis-registering the "card extender"
Cut the gold-plated edge connector off an old board leaving enough track to
each land to be able to abraid back and solder ribbon cable to. Solder one
side of the ribbon cable to this set of edge contacts and with a hot melt glue gun
glue a piece of blank PCB abutting this set of contacts. Solder second side of
contacts and hot melt glue in place. Gives something to purchase on when introducing
and extracting the "card" extender. High frequency working with such a "board" without
ground plane would probably lead to anomalies.
"worn" pot tracks
Specificaly compound dual pots where there is a problem with the "middle" pot
that cannot be accessed internally without destroying the other pot. Recently
came across a custom dual wire wound ,log C-law winding,pot in bakelite casing but probably
applies also to tin-plate casing as well. In the area where the 3 terminals protrude
through the casing and in the direction away from the pot track cut into the casing
with Dremmel and cutting wheel or ball mill to gain some access. Squirt in
methylated spirits to expel swarf etc. Soak in meths to soften any deposits and
dislodge with cotton wool bud etc. Then coat with silicon grease/graphite mix.
1 inch, low current, fuses
As used in some Solartron equipment
Break a mains or 1 1/4 one and solder the end caps to a 20mm one
Marconi test equipment of the 1970s.
Problems with double sided PCBs and the thru' board via connections leading to intermittant
and regular function failures. Resolder all such thru' board points as they are not visibly
"dry joints"
Breaks in cables including co-ax cable.
Use a needle point (described elsewhere) to pierce the outer (and braiding of co-ax)
to pick up the core and use a continuity checker. Breaks are often near the end at the
connector ;so can cut back perhaps a few inches and reuse the rest of the cable .
Waggle the needle in a bit of dowel around to move the screening out of the way a bit to engage only the core.
Earth's magnetic field tilt on oscilloscope displays.
If the DC coil round the CRT has a break use a small magnet mounted with velcro
to a pad glued near the front of the CRT and adjust to suit. Gives slightly curved
traces but usually adequte for readings at centre of display.
Get by ESR meter.
If you own an LCR meter, usually only 1KHz eather than the 100KHz
of a proper ESR meter so not emulating SMPS situation.
Put a pair of crossed germanium or
Schottke diodes over the probes , to limit the voltage applied
if used in circuit. LCR meters may have 10 volts peak to peak
on the probes. Use on the resistance scale over any suspect
capacitors. If measuring capacitance with this voltage limiter adaptor,
beware of capacitance effects of the diodes, easily equivalent to 1nF for Ge.
IC protector for monitoring IC voltages to avoid the situation of the 'scope
probe or DVM probe accidently bridging adjascent pins. Cut down the outer plastic
casing of a linear connector (like Harwin type) with matching pitch and temporarily place between the
pins of the IC.
Irreversible Thermochromic materials/chemicals
Commercial thermochromic labels seem to have very
restricted ranges, large physical size and expensive for
what they are.
If anyone can add to the following list of useable
materials please email me.
Painted, perhaps mixed with light coloured dye to
distinguish active side, onto paper , dried , rolled
up, flattened and fed through an ordinary paper punch
for small dots to fix with known high temp gummy glue/
RTV/Silicone sealant to whatever for monitoring.
Thermal paper for fax machines or till rolls (the material
I had turned blue) stained to show active surface
changed colour (ink rather than felt tip that reacted) about 70 degree C
Potassium dichromate, a weak solution giving
a light yellow tint, turns light brown
at 85 deg, mid brown 95 deg, dark brown at
130 degree but go higher then goes grey on cooling
so beware.
Photocopier toner fuses about 90 degree C but
could not think of a way of using it for labels.
Mylar film (or metalised plastic anyway)
bubbles/wrinkles 75 deg , shrinks
80 degree and shrunk to 1/4 95 deg.
Hot-melt glue, formerd into strings, cut up
to cylinders. The one I tested changed cylinder
form at about 105 deg C so melt one surface
with soldering iron and adhere to monitored surface.
Fluorescent paper looses flouresence at 100 deg C
Liquidised red cabbage, room temp ,
light blue/grey, goes definite grey at 110 deg
and brown at 150 deg
Gardeners Cheshunt compound , mixture of copper
sulphate and ammonium carbonate goes from
pale blue to light brown at 135 deg
Plain white soap rubbed onto paper
goes brown at 160 deg C
Some commercial stationary supplier sticky
dot labels, all stayed colour fast to 200
degree C except the dark blue that turned very dark
blue at 200 deg C.
Use rTV or silicone sealant or high temp contact adhesive
to mount but make sure it does not react the colour change
of till roll paper
Poor man's strobe.
Connect an ordinary LED to the output of an ordinary square wave audio generator.
Assuming enough current to drive an LED also if much larger than 2V pk-pk put
a suitable dropper in series with the LED.Subdued room lighting is required to observe
stobe action with spinning shaft ,pulley,video head drum etc.A frequency counter
attached also to the sig. gen. will give exact frequency.
Put at least one index mark (gummed label, reflective glass bead tape etc) on the rotating item.
Usable with a general purpose LED up to fairly high rotation rates.
To check for constancy of rotation of a vcr head drum you may have to observe at
a lower "sub-harmonic" of the line frequency as an ordinary LED may not function
at these frequencies.
BA screws/bolts/nuts in the USA and UNC/UNF in the UK
For just the odd missing screws/bolts situation.
It looks like the solution to this problem is someone in the UK to tie up
with someone in the USA and a packet of assorted small size UNC/UNF nuts and
bolts go surface mail one way and a packet of various small size BA mainly /
mm nuts and bolts goes back the other.
The commonly used sizes for electronic kit in the USA
are 4x40, 6x32, 8x32, 10x32 and rarely 10x24
screws.
In the UK 2.5, 3 and 4 mm and 6 BA and 4 BA.
Cabinet hardware being larger sizes.
Now where the !*~! did I put that
Anyone else, like me, remembers exactly where something was originally. Then
it gets to the stage where you have to have a tidy-up and now buggered if
you can think where you put it in the much more recent past. I'm aware of
this fact of life and I try move things to themed areas if possible. But it
still fails, my idea of themes perhaps change.
I think the main problem is using the item from its new place of storage and
just not returning it there but somewhere else or just to the ever
accumalating heap of assorted kit around the work area until that area has
to be attacked.
See the "volcano" principle of desk-top management - you allow papers to
build up and up knowing that if you don't disturb things then everything is
in chronological order of when it was placed there - until it gets to the
stage of "larva" of cascading flows of papers onto the floor when something
has to be done about it.
I think I'll invest in some sheets of those little bright circular paper
sticker dots. Then a 3 or 4 dot system.
First dot , one colour , for each room or shed , garage etc.
second dot - for each bay or cubboard has a different colour in that room
third dot , different colour ,for each shelf in that bay
fourth dot for small items within one box on a shelf all one colour
Even computer recording stuff would only show where things should be ,
rather than where they actually are - perhaps one day everything will have
RFIDs and problem solved.
A problem i find is the "in progress" repairs. Kit that is opened up ,
trouble diagnnosed , but a replacement part has to be ordered and delivered.
There is no point in putting all back together only to taake it apart again
when the part arrives. So manual , specialist tools, meters etc relating to
that job, that would normally live elsewhere, have to be associated
together until job complete, hopefully.
On a related theme - for a large collection of paper-bound manuals or data
sheets.
Never pull a manual without replacing its position with a coloured piece of
filing card as its so easy to either not replace it in the stack or replace
it in the wrong place, and then effectively lost until you spy something out
of alphabetical order , years later.
Thermal switch of make T'-key, T-'key, T'key,4key, T?key ?
Bimetal dome, snap action, switch .
Google has failed for this one, other
than another failed usenet enquiry
Marked T220, so at first sight looks like the temperature
but is it centigrade or fahrenheit?
and 10 amp /250V or 15A/120 V
Other markings
C1-2026 ?
125-a15 ?
07A15 ?
not too clear ink-jetted markings
looking under a low power microscope the logo is probably
T'-key with the ' over the - symbol
did find some images though
http://mysite.verizon.net/vze1otp1/Ebay/122fthermalswitch1.jpg
http://mysite.verizon.net/vze1otp1/Ebay/122fthermalswitch3.jpg
those are also mould marked T220, but those are apparently 122F
Ebay is useful sometimes
I've not found any T'-key company site but with those Ebay ones being 122F
with product code 050-15 and 50C = 122F
The one I have the middle code is 125-?15 so probably 125 degrees C = 257F.
This one I took to 120 degree C without it changing state.
Other Thermal Switches of type with logo of
C followed by 2 square wave pulses
KSD301
K85 probably (smudged)
Checking in a can of water and it goes s/c at 86 degrees C
and reverts to Normaly Open at 71 deg C
So the 85 means 85 deg C and perhaps K means NO
Another occasion thermal switches marked VDE KSD 301
2 of this make and type? on power amp heatsink with no other markings other
than moulded numbers on the black housing, so unlikely to indicate temp etc.
One marked 23 is n/o , to activate fan but seems rather high click over temp
(soldering iron activation), temp not actually measured yet.
The other is n/c marked 14, overall cutout
Anyone know how to decode these mould marks assuming they do relate to
temp/type or any other ideas?
If I was designing amps ~ I would only use normaly closed switches as
failure mode is usually o/c or high impedance plus each of these use 2 pairs
of connectors in line back to solder points I would choose fails safe mode.
Fan one tested higher than I would have thought but as usually only used at
low power , will leave unchanged
Fan one cuts in at 68 degree C and out at 45 degree, checked up and down
twice for reduced "hysteresis"
overall cutout one goes o/c at 90 C and s/c at 60 C
Dealing with foil ribbon cables.
That is the thin cables 1mm or .05 inch spacing with conductor ends that mate with small pcb "edge connectors".
Often white with small blue reinforcement at the open ends or phenolic brown in colour
perhaps Kapton Polyimide.
Before replacing these ribbons in their sockets bind some upholstery sticky tape a few times
around each end overlapping the small plastic reinforcement strip if present to give a much firmer
end to avoid buckling and cracking the foil conductors on reinsertion.
Making audio tape recordings of uninterupted 4 hours or more.
Use a standard vcr with external audio and video baseband 1V inputs.
You need a video source from some external source eg other vcr,video camera
etc. Feed this in video-in to let the syncs pull the servo system down
to the correct speed. Feed the audio mono or stereo from tuner,microphone/s etc into the vcr
switched to external input. A vcr with long play option could increase
the recording length to 8 hours in one uninterupted run. Use the vcr timed
record to record at preset time.
Salvaging the copper and iron from large transformers.
For obvious reasons not for sealed transformers or
the ones that contain oil.
When having a garden bonfire of brushwood cook them in the
bonfire. This burns off the cloth, paxolin, varnish from the wire
and more importantly from the iron "E" and "I" plates, also
makes undoing the bolts easier (when cooled of course).
I suppose because of the heatsinking of all the bulk
of metal the flames do no turn green, presumably only occurs
if the copper gets a lot hotter.
Undo the bolts, hammer the iron slantways to break any
remaining stiction. Ratio of retrieved metals would be something
like 1Kg copper to 3.5Kg iron
Repairman's knot
I started a usenet thread enquiring about the
knot for tidying up the mains lead of equipment.
I was aware of an ex-services variant where the
plug is jammed up against the cable entry point
into the kit and everything is so tight that you need
a screwdriver to prise the knot apart.
Mine is a bastardised version of this much more
elegant one courtesy of "Arfa Daily"
"Assuming that you are right handed. Zig-zag the
cable in your left hand, starting up close to the equipment, and making the
zig-zags about 8 inches. Make about 5 or 6 of them, which should have used
up about 1/2 to 2/3 of a 'normal' cable length. Stop zig-zagging when the
cable end, with plugtop, is away from you. Now take the remaining cable in
your right hand, holding it close to where the zig-zagged piece is hanging
out from your left fist, and take a single tightly pulled turn around the
end, winding away from yourself. As you complete that first turn, angle the
cable in towards your left hand, so that it crosses over the point where
that first turn started from. This locks the turn in place, and now you can
just go ahead and keep winding the spare cable around, feeding the
zig-zagged piece out of your fist, as you go. If you've judged it right (
years of practice ! ) You should get about 11/2 inches from the equipment
end of the zigzags, when you have about 6 or 8 inches of cable left. This
last piece of cable is formed into a squashed loop, and fed through the end
loops of the zig-zags. It is then pulled back over the zig-zag loops, and
finally, you pull on the plugtop, which pulls the last loop in nice and
tight. This method is the neatest I've ever seen, and NEVER comes undone on
its own, unlike attempts that I've seen many engineers make, to reproduce
something similar. Where they usually go wrong, is wrapping in the same
direction as they made the zig-zags, This fails to lock that first turn in
place, so the whole wrap becomes loose and sloppy. It's a lot easier to do
than describe, but if this is the standard old repairman's wrap that you
were looking for, I'm sure it will come right back to you as soon as you try
to follow this."
http://www.nbndesign.com/stuff/Wirewrap1%20end%20result_320x240.jpg
http://www.nbndesign.com/stuff/Wirewrap2%20first%20turn_320x240.jpg
http://www.nbndesign.com/stuff/Wirewrap3%20all%20turns%20in%20place_320x240.jpg
http://www.nbndesign.com/stuff/Wirewrap4%20loop%20fed%20thru_320x240.jpg
http://www.nbndesign.com/stuff/Wirewrap5%20loop%20pulled%20over_320x240.jpg
http://www.nbndesign.com/stuff/Wirewrap6%20endgame_320x240.jpg
Opening TV/VCR remote control/zapper cases.
The best tool for opening the snapped together 2 part cases found
in such items is the human fingernail attached to finger. The chittin?
has just the right amount of strength,rigidity and flexibility to get into
the gap and bend into and separate the parts held by the nibs.
To help determine which part of the cover separates from the
other, carefully squash in a vice. If a gap emerges try old
credit card plastic in the gap, screwdrivers will always scuff
the edges. A guitar player's plectrum makes a good fingernail substitute
and a bit of heating of the case with a low heat hot air gun.
For plastic welded or superglued cases like plug in power
supplies (wall warts) try squashing in a vice , short ways across
each pair of edges until there is a fearsome crack noise. Or if weakness of cable hole is
on the long side.
Not perfect as does not break always on the original join
line but the wayward cracks are just wobbles rather than
extended cracks in the 2 such boxes I've opened like this.
Less messy/safer than trying to knife in or a saw or
a thin grind wheel in a Dremmel and blunt ended
eating knife blade.
To rejoin such a plastic box, never fails where it was originally joined .
Applying superglue and using cramps will be somewhat weak. After that preliminary , if there is a recess
lay superglue in the slot and then black lacing cord (nothing cotton) .
If too narrow a slot , twist up the cord and then lay in the superglue.
Or black polyester string or thread, note not cotton as fierce reaction with superglue
or even scooby-doo thin tubing.
If there is one screw inyernally and the type of box with plastic closure tangs that you cannot
separate the box halves with plectrum and a blade would damage it. Squash shortways in
a vice and break the tangs at the screw end as unnecessary with that screw, then a blade inside
Amps etc with falsely triggering protection circuitry.
Assuming the main + and - rails are balanced.
If you are loathe to disable the protection cct
before powering up with a variac then cut
the lines to the main +- supply rails and insert a
diode first in one rail and power up. If
still triggering remove and try the other rail.
Often the cause is drift and falsely saying
the main rails are not balanced.
If not discovered like that or another cause
then its a matter of disabling the protection
relay/s and powering up via a variac from
a low beginning and watch for problems.
PCB track layout to schematic conversion
Capturing the track layout on polyester pcb - hold
white card laid 45 degrees to the component side and illuminating the card
with a bright light, masking off around the board with opaque card.
Photographing and then greyscaling and upping the contrast, loses the small
component shadows. Broaden or widen to fit the page to give more room
for overlaying components. Giving a very usefull track layout with a bit of manual
touching up for big component shadows etc in full colour before greying
and upping contrast . For paxolin boards illuminate with a linear fluourescent
lamp at the best angle for greatest contrast.
Other photos for resistor values and overall views plus manually recording
overlay numbers that are hidden, transistor types, capacitor values etc.
Print off a mirror version of the tracks so you can lay the components
over the top as if the pcb is absent.
Now the fun bit, it would be nice to expose, onto rubber sheet, pcb etch
fashion. Mark node numbers and stretch into straight lines the DC rails and
one or more other major lines and then manually cut and bridge or whatever
for first stage schematicing.
Anyone know of a pc application that does this stretching of a digitised
image under human control.
cut-down example without any manual retouching of the photo stage
http://www.diversed.fsnet.co.uk/pcb1.jpg
http://www.diversed.fsnet.co.uk/pcb2.jpg
http://www.diversed.fsnet.co.uk/pcb3.jpg
Better than sudoku.
Is there a general guidance for human only layout to schematic conversion
anywhere out there? I tend to start with DC rails but then what. I imagine
the numbering sequence for Rs and Cs should give a broad area of where to
plonk them in the final schematic but a thin infinitely extendable rubber
matrix would be nice.
Deformed hinged plastic switch covers on VCR front panels
Where there is a machine malfunction but the owner thinks pressing the
switch ever harder will make it function. That is where they have pressed
it so much that its permanently wedged in the gap between face plate and
pcb. On demounting the hinge plastic although not broken is permanently
deformed resting on the switch button. Temporarily hold back the cover
in its proper retracted rest position and glue with hot-melt glue 2
small lengths cut off a nylon cable tie,well bonded in at either end on
either side of the hinge.
Removing QM pins from their housings to re-use the housing.
Especially the female pins. Make up two tools consisting of a steel tube with a file handle
fitted to the end. Both made from tube turned at least at the active end to 2.5mm internal
diameter and <4.1mm external. On one of these relieve the internal end surface into a bevel .
Use this one first to reform the pin back enough to allow clearance of the other tool
to push over the pin to the holding matrix to release the "spring" and can then be
pulled out from the other side.
Updated , much simpler tool for QM or Molex - for electrical SOCKET pin extraction
Start with a 4mm babana plug. Push a point in the banana bit , bend
outwards and pull out. With a 2.7mm or near size bit, drill into
the shaft about 10mm to open out. Then a 3.1mm or so bit , a few mm
in to form a lead in. File away the internal ledge with a needle file.
Even simpler tool for QM or Molex - for electrical PLUG pin extraction
Start again with a banana plug and remove the "banana" - thats it,
nothing more, the perfect tool for pushing out the male type pins.
For reconditioning poor contacts , the extraction process
closes the socket up a bit, also re-crimp the wire
connections when removed and clean contact surfaces.
Crude process. The expanding locating tangs tend to be diametrically perpendicular
to the slot in the QM pins. While pulling on the while against the socket, push
aneedle point in the housing next to one of the tangs then the other side.
Relieving overstrong springs in valve screeining cans
Remove the spring and slide of a steel punch so you can pull the large ring over the
the smallest and overset to compress the spring.
Adjusting IF / RF coils
For people who want to take a chance improving radio reception where the
radio basically works but over time the decoding of stereo only works on
the strongest signal or improve the gain perhaps. Where you don't have the
relevant test gear or info to properly align. Measure the depth of the IF slugs
from the top of the cans. Unfortunately the depth mic part of vernier callipers
and dedicated depth micrometers are too broad to go inside IF coils. Make up
few of the following. Get some long bolts or studding and matching brass nuts.
Solder a brass washer to a nut to make larger for each depth guage. Mark I,II,III
etc . Put the studding in the recess, wind down the washered nut until touching the
top of the can and screw down a lock nut,just finger tight. Mark the cans I,II,III
etc and position of slot on each can. Remove the guages and fiddle to heart's
content knowing at least you can get back to your starting position.
Drifting out roll pins that retain pulleys on shafts.
That is the very small pins through small shafts. Even if you have a pin punch
of small enough diameter it is very easy to shatter the high carbon steel
pins of the smallest punches. Use a pop-rivet (blind tension rivet) the pins
on these are fairly high carbon and if bent no great loss,grind the exposed end flat
as they are often snip-cut.
How to make a high magnification binocular magnifier.
That is the sort of magnifier used by surgeons to do intricate surgery while
keeping their head out of the way. The professional kit looks like small opera
glasses fixed to their forhead and costs an arm and a leg. I am often finding with small electronic
kit these days that there is not
enough room between my head and the piece i am working on to leave space
for magnifier/spectacles ,illumination and soldering iron or other tool. Working on SM boards
with components surrounded by larger components means the soldering iron has
to be used almost vertical so just no room to work under magnification. The following looks
ridiculous but who cares.
The main requirement is 6 small plastic magnifiers. The ones i had were front of hobbyist
magazine giveaway plastic pocket magnifiers with plastic lenses. Otherwise similar
very basic magnifiers would probably be in toy or hobby/passtime shops or even
nickel and dime stores.The ones i had to hand were 10mm diameter
lenses of 55 mm focal length but 15mm diameter would probably be better.Standard plastic
"Sherlock Holmes" large types would have to be cut down to 15mm ,even sawn square
would do, to be manageable.
Make 2 off of the following. Stick 2 lenses close together,in this case 6mm apart
and mount in a cardboard tube (for the lenses i had ) 90mm long or whatever length to bring
into focus. Mount one ,with doubled lens nearest,centrally
to each eye (which may not be the centre of the specs) on a pair of plain plastic
lens safety spectacles . Glue a ring of plastic to the specs to locate the end of the
compound lens barrel. Then with 3 or 4 cut down cable ties glue the barrel to the edge
of the specs. Cut off the catch end off each tie and mount other way about so
only relying on friction and not the tooth/rack part of the clips. This allows adjustment
of the pointing of the barrel essential if using 2 such barrels and full binocular
viewing. Also fix some strong elasticated cord to the specs to go around the head as
the extra weight will pull the specs out of eye alignment and soft tape on the nose bridge piece if
rather angular.
The image is upside down and somewhat distorted
off axis but for my lenses gave a x8 magnification and 200mm of clear space between the
workpiece and the first lenses and a whopping 300 mm between my own head and workpiece.
Paint the surrounding part of the safety specs with black paint to reduce the distractions.
I gave up making a binocular viewer settling on a monacular . It seems almost impossible
with this sort of magnification to get the centre of each eye on axis with the barrels and
zeroed in on the same spot for binocular viewing.
Professional ones presumably have pentaprisms and mirrors to give right-way-up image
and reduced front to back length .
Lost mains leads on old equipment with obsolete connectors.
Often seen with the linear type connectors found on Telequipment
scopes but any other old equipment can have the same problem.Remove
the original socket and replace with an IEC or smaller cassette
lead connector if space is a premium but beware earthing ,3 wire, is
often required.
Radio dial cords and tape drive belts repair.
Tune into a familiar station.
Before dissassembling, with a felt pen mark across the cord and main pulley
attached to the air-vane tuner capacitor, also mark the path of the cord around
pillars and pulleys and position of dial indicator.For complex cassette tape drive paths
do the same.
Removing those black plastic cord grips for mains leads
That is the through chassis grips in two parts a major and minor
part fitting through a hole with 2 flat sides. Use mole grips (lock-
jaw pliers) to compress the 2 parts to give enough leeway to remove. Also
useful for placing/replacing these cord grips.
To remove the more awkward circlips
The type are relatively thick with no gap between clip and spindle and
have sickle shaped open ends.From a set of cheap jewellers screwdrivers find
one that is just bigger than the gap between the 2 V notches in the open ends.
If the circlip is bearing against a rigid surface slightly round the edges of the screwdriver
and force into this gap and the clip usually comes away and leave held on the screwdriver
for later replacement.For free standing clips back the clip with some pliers or suchlike.
An improvement on the pencil graphite on worn potentiometer track trick.
For pots that are worn and it is not possible to replace or adjust the sliders to
an unworn part of track. Often seen as the slider pots on cheap stereo units.
Make up a paste of one part silica gel (silicone grease) to one part of powdered graphite (from locksmiths /
hardware stores for locks as dry lubricant) into a paste and smear onto the track.
Packing fragile items for the postal system.
As well as bubble-wrap inside cardboard boxes consider
the following. Save pint or 2 pint plastic blow-moulded
milk cartons and use like Storopack. Clean out and dry with cap off. Replace the
cap and use as packing inside a larger cardboard box than
you would otherwise use. One on each face acts like
car air bags or even Martian lander. Perhaps part fill each bottle
with polystyrene chips in case the bottle bursts
in a heavy bump. If the gap is too small then release cap
and squash a bit before replacing cap. Tape in place
around previously bubble-wrapped item. I sent an old bakelite
cased meter to Italy using this technique. It already had a known
crack in the casing and didn't worsen in the journey - which is
some testament for the technique.
Another tip - some packaging that small domestic electronic items
are delivered in can be unfolded and folded back with outside,
with printing on, becoming the inside and plain on outside for re-using
Stringing parcels to form a handle
Cut sufficient heavy duty string. Form a bowline or
a loop at one end. Place the free end of the loop on the top
of the box about 2 inches from one end (longways) , pass
around (shortways) and up and through the loop then back
down over the end , under and back up the other side.
Hold a right angle on the top , same position from the end as
the first loop end. Go round shortways and back about
this angle and close across the top , tying-off and
loose the escess tring by repeatedly going back and forth
this central top section to form a handle.
Using a wheelie bin for parcel delivery drop-box whan absent.
Preferably a recycling bin as generally cleaner.
Fix the main handles to a screw-eye fixed in a post or wall
using a chain or wire and padlock. To avoid the dustmen
taking it away if they collect on the non-appointed day, mainly.
Pack out with boxes or something so not too much a drop.
Find a car "crook lock" to hook one end around the
wheel/axle (may need hook opening out a bit).
Then another padlock and wire or chain to form a loop
through a top lid handle and the top hook of the crook
lock and adjust the length and lock off the crook lock to
that length. Open the top lock/chain/wire and leave
open for parcel deliverer to close off. That padlock must be able
to be closed and locked without use of a key.
Converting D or O section potentiometer shaft to spline type.
This situation arises on amplifiers etc where one pot needs replacing and all the
knobs match but have splined shafts and the only type of replacement pot you can find
is D or O in cross-section.Find a sharp screw-threading tap (for cutting screw threads
into bulk metal ) of about 1mm pitch.Cut the
D section shaft of the replacement pot down to the required length.With a scraping
action using the cutting edge of the tap (along the flutes of the tap) scratch grooves
axially along the pot shaft. Or use a thin grind wheel or saw in a
Dremmel to cut slots and grind down the diameter a bit if necessary.
You don't need to be accurate,in practise enough scored/ground
grooves will engage with the knob and hold even if the back-torque of a combined
switch action is involved integral to the pot.With a hacksaw cut a slot part-way
down the shaft ,axially , and perpendicular to the flat of the D.If the knob is too tight
then increase the length of the slot.
Dealing with short-circuit Ni-Cads
Treat each cell seperately but it is not necessary to break up packs,only strip back
enough covering on each cell to gain electrical contact.Find a large electrolytic
capacitor something like 20,000uF,80V and connect to a supply with ordinary hook-up
wire giving 70V at .5Amp say,the power supply must be able to survive a
short-circuit on its output so use a dropper if this is not the case.From
the screw terminals of the capacitor run two thick wires,cooker cable or car
jump start leads to discharge through the short in the ni-cad.This will only
work on dendrited cells that is where a thin whisker or whiskers of metal grow
to bridge the plates,more extensive internal shorts will remain.Fast charged
cells that develop shorts would appear to be due more often from internal
dimensional changes and plate to plate contact.When discharging avoid looking
at the blue flash and possible arc-eye.A high current can pass for a short
duration but not enough energy to explosively heat up the cell should the
discharge wires/clips weld to the case of the ni-cad.Ni-cads that have
chemically broken down,that cannot pass current and have terminal voltages
substantially above 1.4V on charging can only be cut out and replaced.Beware
of the white powder found on such Ni-cads as this is poisonous so wear latex
gloves/wash hands after handling such cells.
Cheap and cheerful rubber drive belts
Whenever you go past a cycle repair shop,a motor-cycle
repair shop and a car/commercial vehicle tyre fitting company go in
and ask for a scrapped inner-tube.For tape players a range of tubes
from moped to big motor bike suit best. From a collection ranging in size
from high performance racing cycle to lorry tyre via wheelbarrow innertubes, it is possible to cut a good range
of belts. To increase the range it is often possible to make diagonal cuts
across the tube to give longer belts but residual "twist" in the belt
can cause riding up and down on "baluster" bulbous pulleys but fine
on plain cylinder type pulleys. I've not tried this yet but it might work.
From a slab of lorry inner tube cut an oversize belt and tidy up
using the "bean slicer" technique of the next tip using a couple of
spaced razor blades.
How to split rubber drive belts that are too wide or thick
In conjunction with the above tip.
Need a razor blade and pairs of thin washers or spacers and
an engineers parallel jawed clamp.
Find washers and razor blade combined thickness just less
than the thickness of the rubber.Set razor sandwiched by washers
in the tightened jaws of the clamp with the
cutting edge a few mm protruding at a reasonable cutting
rake angle.Carefully make an initial cut and then pull
through the length of the belt.Repeat for quartering a
square section belt.
For bands made from lorry inner tubes the rubber is too thick for
the bands required for vinyl record decks and the like but they can
be halved or even thirded in thickness after some practise.
Cut across the inner tube and place a tub or something inside to pack-out .
Cut some vinyl tape of the right length (usually smaller than the original
band length) also reduced about 3 percent as the following splitting process seams
to lengthen the belt. Wrap around the tube usually diagonally making
a good line with both ends touching sticking to the tube. Crudely cut from the remainder.
Clamp to a board with cramps a thick metal plate with sandpaper glued on
one face to stop the rubber slipping when cutting. Cut about 1/3 of the
circumference at a time with craft-knife to give band of right width.
Pare away any original moulding streaks on the rubber
Select 4 washers of the right thickness so 2 plus the width
of a pointed scalpel blade is just less than the thickness of the rubber.
With hot melt glue bond 2 washers either side on the wide end of the blade.
Do same on pointed end ,cut away any excess glue so can mount in a clamp and remove the washer
assembly from the pointed end so can pass through the rubber after initial piercing.
Clamp rubber between some small blocks around 3 sides and
with a needle point push thru halfway on the narrow edge then reverse and repeat on the other side.
Then with a scalpel blade push in both ways round on one side then repeat on the other
side. Refix the washer assembly and clamp in an engineers clamp and mount
this in a vice with the scalpel cutting edge angled to give a good cutting angle
to the rubber . Then with leather gloves and goggles in case the blade should pull out.
Pull the rubber through splitting in 2. The skill is constant tension on the lead and
a lesser tension on the tail to give an even thickness of cut. The cut surfaces
tend to bind to one another so when finished and parted coat in talcum powder.
Typical result for a 5mm wide band ,1.5 mm thick is an extension characteristic (one section)
when pulled of 110 percent elongation per Kg. The end result is unlikely
to be as uniform in section as a manufactured belt but the acid test is on a
record deck with strobe. Probably because although the extension in different parts
of the belt vary ,the tension in the belt is the same. Anyway these belts seem to pass
the strobe test. Use the belt with cut surface away from the pulleys as tends to be rippled .
For cheap plastic (no inertia) plattens on cheap music systems
it may be different matter. I thought of trying a basic engraver tool to
hold a 2-blade cutter but that did not work but the holder arrangement
worked well. An old pot shaft with flutes , cut off the 2 half circle pieces.
Plus a piece of 0.3mm thick by 6mm sheet metal and 2 scalpel blades with
a bit of the bellied out section ground back to fit into the vibrator
jaws. So shim between the scalpels and the 2 bits of pot
shaft either side, compressed into the jaws. Push the points of
the blades through the rubber to start, clamp the points side
with some of the same shim between and an engineer's cramp
, and pull through, resulted
in quite even and ripple/blemmish free 0.6mm thick rubber band.
Anyone know of a simple source of 5 to 7mm thick rubber sheet,
lorry inner tube is only about 2mm thick. Clamping the sheet to
a VCR head cylinder and bearing may help in band cutting,
not tried yet.
2011, a way of joining rubber without recourse to that extremely expensive 2 part primer
and superglue that has gone hard the next time you need to use it.
Came across Loctite Power Flex, rubber infused superglue. Made up a test lap joint
from 2 pieces of 7.5x0.75mm rubber. Abraided surfaces with Dremmel and grinding disc with scoring
transverse to band tension. Applied glue, cured under 500gm pressure of 2 bits of
manicure sanding board glued into the jaws of a sprung wooden clothes peg.
Testing this came to 1.5Kg breaking tension , not really adequate. Googling for flexible adhesive
saw reference to culinary glycerin added to hide glue to make it flexible. Tried a spot of glycerin
on one side of joint and this superglue on the other and test pulling survived to 2.5Kg but with
ends starting to separate. Repeated by mixing 1:1 and test came to surviving 3Kg with ends distrupted again.
Not tried in earnest yet but will try either of these. Make joint and clamp with small engineer's clamp across
one end 1mm into join and another clamp on the other end, Then tension the gap between by a
spacer each side of about 50 percent more than the free gap to tension the main joint area.
Or taper the lead in and lead out rather than straight across cuts. In both cases after curing , grind back the
butt ends to something like uniform band thickness and joint plame diagonal across width. Mount
the band with drive direction going "with the flow" of the cut , not against and so catching the join. Whether
this will survive long term or tight radius of curvature around a bulbous pulley is unknown as of typing.
Making defunct CRTs safe
To release the vacuum inside a CRT. Remove the multipole connector from the
neck of the tube and at the centre usually is the point where the air is
evacuated originally and is usually the weakest point.Take outdoors and place
CRT-face down on cardboard or similar on the ground and
cover the whole CRT with something like the composite back panel
off the TV with just the centre of the CRT neck exposed.Wearing
goggles lightly tap the weak point with a centre-punch and light
hammer to crack the glass just at this evacuation point.I've never
known the whole CRT tube to implode doing this but the extra
protective cover should be used.
Note of caution for long-term storage of ICs
Some black conductive foam is hygroscopic in the long term and can
cause complete corrosion of the legs of ICs and trannies etc in an
ordinary storage situation ,not necessarily a damp garden shed.
To make coiled extending cable,where off the shelf multicore coiled flex is not
available
This method will work on relatively thick sleeved cable i.e mains rather than
signal.Find some wooden dowel of the intended internal diameter of the coiled
cable.Nail one end of the plain cable to the dowel,fix the other end of the cable in a
vice;twist the dowel until the cable "upsets".Roll the cable onto the dowel in
the sense that contracts the helix on the dowel,nail the end that was in the
vice.Now while turning the dowel heat with a hot air gun to the point where
the sleeving is about to melt,allow to cool.Someone told me using a pan of
boiling water as the heat source does the same job but I,ve not
tried it but it would give even heating.
To make a detent for a standard pot.
Assuming a standard D section of pot shaft. Obtain
some phospher-bronze door draught-proofing spring strip.
Cut off a small length and form the cut end into a rolled form
and mount the other end to allow the rolled part to press
against the flat of the D. For circular shafts, file a flat spot.
Dealing with fractured Monkey metal / Junk metal castings.
This is the metal that when fractured reveals a distinctive granular
appearance otherwise an aluminium type of colour.Glue back with
industrial epoxy then after curing drill angled holes through the plane
of the fracture and insert glued reinforcing pins (squashed along the length
with double action cutters or pliers to indent to give mechaniclal bond).
For thin metal make shallow angled pilot holes.Make a small clampable block
with an oversize pilot hole to guide the drill bit at a shallow angle or make
a chain drilling of about four holes,3mm deep to make a trough to allow location of drill bit
when drilling at an acute angle to the face.
Removing the nuts from bolts with recessed heads, eg coachbolts,
where the square part of the stem has been graunched or the "square"
in the chassis graunched so the slotless head spins.
Assuming enough overhang of bolt.
Find a matching nut and hacksaw a slot in one flat.
Mount on the bolt and grip with mole-grips , across the split,
so not to distort the thread. Then enough slack to grip
the internal part of the thread or perhaps grip
the head of the bolt then. Hacksaw a slot
in the head if re-using.
Conductive Rubber
Don't be tempted to use bicycle/motor cycle inner tube as rubber insulation. It
is slightly conductive,won't show on a 20M ohm DVM but put a 500V
Megger (insulation tester) and it will be perhaps only 100K.
Desoldering ICs
Use a hot-air paint-stripper,1400W,500 degree centigrade,with 2 level heat
control to prolong element life. Activity may appear fearsome but it is no
worse than a flow-solder bath.Pre-heat for one minute then apply to pcb,make
extractor tool to pull ic from component side. Make an IC extractor from an old large pair,10 inch, of
circlip pliers,the jaws need to open out enough to clip around the ends of up to 64 pin
ICs with enough force to overcome the mechanical force of the situation where all
the pins are angled relative to the PCB holes.Forge around both of the original circlip
pins,one joggle at right angle to clear the heigth of the ICs and a slight inwards joggle
to make purchase on the underside of the IC,grinding a wedge angle to the points
helps particularly where there is no clearance between IC and pcb.
[ Because of these joggles this tool is also useful for depressing the rear grippers
and releasing of that type chassis mount fuseholders and switches when internally surrounded by other
components , also depressing both plastic grip-flaps on mains rocker
switches for removing from panels] . Another tool , bending back pins, before desoldering.
A dart with the flight replaced with a bolt as a handle. Before heating at all
excavate around the pin with the dart and lever up the pin.
I have to emphasise that you cannot use a "standard" IC
extractor tweezer, they are just not man enough, you do have
to manually pull with a few pounds of force to guarantee
minimum amount of heating of the IC.
For awkward positions lock the pliers to the IC by wrapping
a cable tie around the handles, tighten, slide down and
add a couple of notches to the tie and force back along the handles.
Use this technique for salvaging (working order) up to 64 pin ics ( when practised ),other
components, sm and even repair (tracks are not dislodged).For repair work beware of
spatter of molten solder causing solder bridges on adjascent compoents because if you
are doing the job properly,ie not dislodging pcb tracks the IC must be pulled out with
some force and the board tends to flex so possibility of flicking solder.
Mask off surrounding areas with wide aluminium tape or thick plummer's PTFE tape around
both sides of board to avoid unsoldering
and flicking off nearby minor components and trap any that do.
The secret is to be as quick as possible,idealy the body of the extracted ic will
be just about handleable rather than too hot to touch.Try practising on a board
with close packed TTL chips or similar and aim for an extraction rate of
something like one every 2 seconds.Between boards keep the hot air gun running on
low power setting (not switching off).Don't rest the gun against the board when heating
as vibration seems to affect the element life also don't allow the board to
flex back onto the gun for the same reason.Hold the gun so airflow is angled to the board
as solder spat directly into the nozzle can kill the element.
About the only components that cannot be removed with this technique are parts
moulded in soft plastic,e.g. crystal sockets,rf coils with plastic former (IF coils usually OK)
some DIP switches. Even these are desolderable intact if the body of the component is previously
cooled with a blast of aerosol freezer spray.
You definitely need a tool to pull the IC off the board as soon as the
solder is non-solid/breaking up ie before even fully melted quite possibly.
An old pair of long nose pliers with the ends ground down so the remnant
tips can be bent inwards to grab the ends of the IC would probably be
sufficient to show the method works.
Also definitely practise on an old/scrap board first as it needs that
confidence because otherwise pointing a glowing hot element and 300 degree C
or more blast of hot air at a pcb is not a natural thing to do.
SAFETY NOTE:- ensure good ventilation, use safety goggles because trapped
water etc in the capaillary structure of glass fibre reinforced PCB can super-
heat to steam and jet out molten solder,also it is possible to overlook small
electrolytic capacitors on the solder side of the board which of coarse explode
with the direct heat of the hot air gun and beware of very
slight risk of combustion of adjascent flammable parts especially where
components have extra (un-noticed) mechanical bonding leading to extended
duration of heating activity.
For surface mount devices a pair of middle size medical forceps may be preferable
as far as gripping the body of the IC with the teeth. Wrap some nylon spiral wrap
around the finger holes to releive the local pressure on your fingers. Higher
force and for longer duration than for medical use.
Dealing with certain type of inter-board ribbon connectors.
This tip relates to the connectors,usually white ,used by Pioneer and other
manufacturers. On first coming across these connectors they seem to be make-once
at manufacturing stage and cannot be undone. Pulling on the ribbon only makes
the angled teeth inside the body of the connector dig into the stripped conductors more.
The cover clip cannot be removed
because the un-stripped ribbon bears directly against the cover piece.One side
of this cover is thickened the width of the ribbon,find a piece of flat metal bar
the length of the connector body
and push down on the thickened part of the cover in direction towards the
pcb to release,localised finger pressure is not enough.
A drop-box for parcels/packages, as theyb always arrive when you are out.
A screw-eye into a wall , at the height of the handles of a wheelie bin. A long cable-type bike lock and a car crook-lock and nut, bolt and 2 plates to close off one hook , to pass the cable through, then through the lid handles and screw eye. A box to hold the lid open enough to a bit more than expected dimension of package. Fix open loop end of crook lock around a wheel axle and pull the ratchet until all is tight and bin tight to the wall. Some padding in bottom of wheelie bin.
A large notice at the door bell . Postie even made out a card to say he'd placed in the bin
To free seized equipment knobs
For the situation where the knobs are seized onto the shaft by rusted
grub screws,especially where the screw penetrates the shaft;
after you have butchered the grub screw slot try this.
And it is one of ten virtually irreplaceable knobs.
Make up some guide tubes,small enough to just slide into the hole
in the knob containing the grub screw,these tubes drilled on a lathe with
a clearance bore to take a drill bit. This drill bit usually needs to be
extended by brazing onto a longish rod (so the chuck of the
drill misses the face of the equipment).
Use some cutting oil and drill into the grub screw.
Ideally use left hand drill bits and left-handed power drill
rotation, such drill bits are available from specialist suppliers ,
other suppliers may look at you as though you're trying to wind them up
(anti-clockwise).
To convert a right hand drill bit well enough for this use grind the
cutting face back on the opposite rake angle, swarf clearance
is not relevant here. Often the bite of the drill bit
into the screw or the localised vibration or heating is enough to
shift the screw, and because of left handedness, undoes.
A hammer action would be useful. With any luck this
would be enough to slacken the screw enough and again luck
not held on a flatted shaft so can wiggle around and off.
Only use finger force if a flatted shaft.
Now use a small "easi out"(maybe this is a UK trade name),but consist
of a coarse left-handed cutting thread on a coarse taper.
Wind into the hole in the grub screw and hopefully extract.
I don't use easi-outs as the smallest ones for this
purpose are very week and if it breaks you have
a lump of high carbon steel just where you don't want it.
Maybe appropriate for very large knobs only.
To help remove the remnant try turning with a
jeweller's screwdriver or dart point.
If this fails repeat the first procedure with larger diameter drill bits
and appropriate protection sleeves
until nothing remains of the grub screw,retap a larger hole and use
a larger grub screw for knob reuse.
Another possibility, not tried yet, as long as set screw does not
pass into the shaft. Mask off the knob with a piece of slotted card. Warm up the knob long enough to
warm the metal core of the knob, blast the stem with freezer spray
and try pulling off , in the first instance and then
repeat the process with wooden wedges from halved sprung clothes pegs
To replace telescopic antennas
Where the pivot screw (usually brass therefore head easily
stripped) refuses to undo with normal torque.Use a set of
mole-grips (vice-jaw locking-pliers) clamped across the
pivot point starting with light compression and gradually
increase force until the screw undoes without undue
force.
For making reasonable looking copies of old bakelite or
unconventional equipment knobs.
Requirements:-
Flexible moulding liquid(obtainable from craft shops for casting chess pieces
etc)/remeltable PVC flexible moulding/silicone moulding material ,polyester or epoxy resin and hardener,mould release agent if required,colourant,
broken rare earth magnet,iron filings,modern-day knob smaller
than required knob,engraving tool for vibration.
Procedure:-
Clean and polish knob from which a one-part mould can be taken{no severe
undercuts).Fix any old potentiometer to a metal plate locateable to a small
container (for precise alignment of knob),mount with shaft downwards.Remove
grub screw from the origional knob,place a small plug of cable sleeving in the
hole and reinsert the grub screw.Fix this knob to the shaft (fast but
removeable by pulling).Assemble mould jig and pour in moulding rubber,vibrate
with engraver to rid of air bubbles,allow to cure.
Mix resin and colourant,preferably keep cool to reduce viscosity.
Prepare the modern knob;mark radial position of grub screw on the rear surface
of the knob,repeat grub screw plug as above,fix to pot shaft. Extend the grub
screw hole with a piece of cable sleeving,plugged at outermost end with glued
magnetic material (length just clearing the side of the mould).
Mix hardener with the resin/colourant and pour in mould,vibrate with engraver as above.
Allow to cure.Demount mould,then with iron filings locate axactly the extended
grub screw hole and drill down to the grub screw,grind rear face of knob if
required,remove plug from centre of knob.
A refinement is to add punched discs,shapes or press-formed domes of brass
shim lightly gummed to the mould base to provide pointers or contrasting finish.
The colourant can be ground down broken bakelite knobs , if you can be
sure there is no asbestos fibre reinforcement to the knob/s,
use a bench grinder with a way of collecting the powder or maybe
cloth dye or artisys paint powder.
Missing knob
If one of 5 matching knobs is missing.
Move them so the missing one is in the centre and add one of right colour
and shape but larger say, to the centre. Or if 2 say volume and dial scale
knob , one is missing , replace both with 2 from somewhere else.
To check out of circuit LCD displays for pinning etc,simply
Touch one pole of a 9V battery and the backplane terminal, usually
one of the extreme conductors. With finger of one hand touch other battery
terminal then with finger of the other hand touch
the other conductors (one or more) which should activate segments
Wet operatives might want to be more cautious.
I know this is dc but it doesn`t do any harm for short duration.
This tip applies to low voltage,low power carbon potentiometers where for
physical constraints it is not possible to replace, so
renovate instead. Sometimes enough room to do the following
without desoldering the pot. Mark with felt tip
the relative positions of the sub parts, bend out
the retaining flaps of the casing metal with a small
screwdriver.
Dismantle the pot down to the carbon track clean/degrease.
Make up resistive compound from photocopier toner and graphite powder
obtainable from locksmiths for dry "lubrication".
the following resistivity values are very approximate for .02 inch thick film.
graphite:toner ratios
1:1 ,200 ohm per square inch
1:10, 100k ohm per square inch
1:30 10M ohm per square inch
Mask off area surrounding carbon track,sprinkle on the powder,fuse the film
in a low oven approx 150 degrees centigrade or hold the barrel of a soldering
iron 1mm from the powder to heat .When fused lightly abraid with a
nail file,and reassemble pot.High ohmic pots are a bit iffy,low ohmic are fine.
p.s. a possible way round the surface roughness if a "wire" ended wiper.
Lay the resistive dust in place. Reaassemble the pot with the wiper at one
end and run the wire fingers, along the track and then undo
the pot again. Then fuse the toner/graphite .
I would be interested to hear of any suggestions for higher resistivity
addmixture for higher ohmic pots (for more even distribution)
Aquadag or whatever EFI/EMI screening black (dries to slightly brown side of black) stuff is , may be useful but probably too brittle and does not adhere to impervious surfaces.
My can of it is too old to get product details RS stock number "551-570" other than it contains MEK and xylene
Hint for increasing storage space.
For doubling the storage capacity of an existing
wall of steel cased,plastic drawered component
storage cabinets.
Obtain some extruded aluminium channel sliding
door gear used in domestic clothes cupboards etc.
Fix the runners to the top of the cabinet/
cabinets.Fix channel to ceiling joists/stout shelf in
front of and above(to avoid fouling top layer
of drawers) the existing wall mounted cabinets.
Fix a couple of PTFE slabs to base/rear to run
against a sheet of wood or metal fixed under
the existing units.Cabinets can be doubled
up,pop-rivetted together vertically with bridging
plates across the joins.Even trebled up if heavy
components are placed in the wall units.For every
3 existing units maximum of 2 sliding ones for
access,for 4 fixed then 3 sliding etc.
Theoretically 2 layers of sliding and 1 layer
fixed cabinets would be possible.
Cheap UV Eprom eraser
Find a small personal sun-tan lamp easily found at car-boot sales,garage sales
in the uk for a couple of pounds. Replace the silica rod/element IR section
with an external mains lamp holder and lamp in the 50W to 100W rating to act
as UV lamp ballast.Plenty of room for eproms and erasure takes about 20 minutes
Ensure there is no UV light leakage to avoid
damage to eyesight
For softening yellow glue , maybe black version
The main ingredients of
Electrolube Lead Free Flux Remover
CYCLOHEXANE 30-60%
PROPAN-2-OL 10-30%
1-METHOXY-2-PROPANOL 10-30%
Servisol 160 seems to be deleted and Electrolube may well be different active ingredient for glue softening purposes , does soften the yellow glue
http://www.crcind.com/wwwcrc/msds/UK20046-23.htm
Hint for checking IR remote controls
To test Infra-Red remote controls for tv,vcr etc.
In subdued ambient light "shine" the zapper
at video camera,CCTV or cam-corder or digital camera, if working then
should be seen flashing on monitor.
Not all lens/camera systems may be responsive to
IR so try with a known good remote control first.
Of course this check only shows there is a flashing
output from the LEDs,not necessarily the correct code
pulse train.
Hint for de-soldering surface mount ICs.
Use a hot-air paint-stripper,1400W,500 degree centigrade,with 2 level heat
control to prolong element life.
Form a ring of silicone covered wire around the IC{to isolate the remaing
components on the pcb.Push a thin piece of wire
under one side of the IC and form a loop around the IC,repeat on the other
side;this is to remove the IC when the solder melts, tug on these wires
while
heating up to ensure minimum heating contact time.
Tungsten wire is best for strength even when only 0.1mm diameter, better
than 1.5Kg UTS.
Place a slab of PTFE with right size hole cut into and
clip pcb and slab together with clothes pegs/Bulldog clips etc.
If the IC is for re-use then cover body of IC with heat insulating material
or blast IC with freezer spray.Allow the hot-air gun to get up to heat{say 1
minute}
before applying to IC.
For more crowded boards make "conical" shrouds to surround the IC. I used
some PTFE strip that i had but thin paxolin or similar but drilled and wired
together would probably do. Cut 4 small trapezoids from the PTFE
or tin-plate and wire at the corners to form a
truncated pyramidal frustrum.
Fixed PTFE together with paper staples but for the smallest shroud
for 8 pin SM had to wire together the final join.
Tie to the PTFE/ tin-plate cone (to stop the blower blowing it off) with
copper wire or temporarily solder to distant points.
Alternative some woven glass mat as used by plumbers
to avoid blow lamp damage to furniture etc.
I used some thin woven mat as used in GRP.
4 bands from silicone sleeving to go around boards to hold the glass mat in place,
and simply move across for adjascent ICs
Stuck 4 pieces together with high temp glue and
cut a rectangular hole in the centre. Again could be cut into
parallelograms and tied to form a frustrum for cases
where there may be voltages from batteries etc on the board.
When practised the heated contact time should be less than
2 seconds - no board distortion or collateral damage surprisingly.
If you can't get the tugging wires under the IC then pass
under a few pins at each corner.
Because this tugging frees the IC at the earliest moment, the solder
on the board is not fully melted and leaves a profile for localising
the new IC in place and then solder pin by pin.
Make a tripod to pre-tug the IC. Three thin rods with rubber feet to find some clear
areas of the pcb. Soldereded to a nut with the screw of a terminal post threaded
through. A hook soldered to the terminal to take a wire with a hook on each end
to pick up the "strop" wires around the IC. Tension up by turning the terminal post
and twanging wires to gauge tension.
Even for thick board and plated-through holes
so only tips of IC leads protrude,
very thin signal traces, traces to tiny pads on both sides of boards of same
pin in some cases and plated vias under ICs as well. I know if i used
"proper " vacuum assist desolder or butcher-and-remove-single-pins , many of
those traces/pads would have dislodged.
I had to sharpen the points of my large adapted circlip pliers to get the
extra purchase on the ends of 14,16, and 28 pin ICs. Not one dislodged
track using a paint-strip hot-air gun. Next time i'll have to take some
before and after pics for the doubting thomases.
SAFETY NOTE:- ensure good ventilation, use safety goggles,and beware of very
slight risk of combustion. Another consideration is a pencil size
butane torch.
Seems necessary to hold the pcb vertical in a vice and hold the pencil
with flame upwards about 20 degrees of angle so butane liquid is not at the
outlet.
Other tips for SMD. If space allows , holding with pliers , push a needle under ,
say under pin 1 and pin 16 of a 16 pinner and melt solder on pins 1,2,3,14,15,16 say.
Repeat perhaps until th eglue spot fails and then progress to hand pushed needls.
Come resoldering , clean up the pads , very very cautiously with a .5mm grinding disc and Dremmel.
Same on the underside of any salvaged IC, before soldering.
For desoldering 2 to 6 pin surface mount devices.
Poke around,cold, between each pin and its pad with a needle point,
leaving one hole big enough to get some leverage into
when applying a soldering iron point. Not very elegant
but often causes less damage to the pcb tracks than
purpose made de-soldering iron tips.
Device type EIAJ codings of form 2SC etc eg 2SB705 2SD2577 etc
First number is number of pins minus 1
S means semiconductor
Third term
A high frequency pnp
B low f pnp
C high f npn
D low f npn
E Esaki diode
F Thyristor
G Gunn diode
H single junction transistor
J p channel fet
K n ch fet
M bidirectional thyristor
Q led
R rectifier
S small signal diode
T avalanche diode
V varicap,PIN or snap-off diode
Z zener
Pro electron device coding
Of type B?? ??? (if silicon) eg BC 107
First letter A Ge,B Si,C GaAs and others
Second letter
A detector Diode
B varicap diode
C Tr audio not power
D power Tr
E Tunnel diode
F Tr rf not power
G miscellaneous
L power rf Tr
N optocoupler
Q radiation emitter as led
R control devices as thyristor
S switching Tr not power
T power control devices as thyristor
U power switching Tr
X multiplier diode ,varactor or step recovery diode
Y rectifier,boost or efficiency diode
Z voltage ref. or transient suppressor diode
Transistors marked A114,A115, A124, A143, A144 etc if they are not
Germanium era , apparently fail diode test and are ohmic
then are probably "digital" transistors, PNP, with built in bias resistors
of DTA114 etc. Similarly C114,C115, C124,C143,C144 etc are
the NPN versions DTC114 etc.
SMD version ("failing" diode test) marked 1N , can mean DTC114/ UN2211/RT1N141C
6 pin SMD marked D12 can be dual digital transistor UMD12N/XP4313
TO92 transistors marked C556 can mean BC556 (not 2SC556)
TO92 transistors marked F422 can mean BF422
Transistors marked N.... may be 2N....
TO220 type transistors marked CSA nnn maybe 2SC nnn, nnn is a 3 digit number
Small components marked with an N.... with a dot underneath the N can mean
abbreviated form of UN.... series of Panasonic / Matsushita .
"X13" packaged transistors (plan view are boat shaped about 2x2x4.5mm )
with 4 numbers marked on top or side WXYZ probably means 2NWXYZ.
I was checking for data on an FT5154 transistor of 1976 kit
probably Fairchild manufacture, large F logo.
Indistinct logo on SMD IC, 4 letters and then audio , Cool Audio
with "o"s extended as musical notes and TM after audio making for confusion on the small scale.
An old German ECA transistor data manual showed it equivalent to 2N5154.
A straight block of 50 or so others listed in that manual from FT1724 to
FT5154 showed the same FT series/ 2N series equivalence,
but not necessarily all.
FT??? in hundreds don't seem to have direct number 2N equivalent
Transistors , ie 3 legs, starting 1 like 1A, 1B, 1C maybe RCA so put
RCA before the 1 to find data.
5 digit only numbers beginning 40 are also probably RCA.
Motorola logo transistors with just a 4 digit number, try putting M before the digits
a useful site
Motorola transistor numbers often have their numbers split over 2 lines
so what looks like MJE130 is in fact MJE13007 with the 07 on the line under with a date number
http://www.tehnomagazin.com/Transistors_data_and_replacement_tables/
HP / National Semiconductor cross reference files
http://www.sphere.bc.ca/test/hp-parts/300-hpxref.pdf
http://f1chf.free.fr/hyper/DOC%20HP/HP-Equivalencias.xls
http://www.hpmuseum.org/cgi-sys/cgiwrap/hpmuseum/archv010.cgi?read=27258
http://www.sphere.bc.ca/test/hpparts.html#cross
HP / Tektronix cross reference
http://www.sphere.bc.ca/test/tekequiv.html
And now a puff for Sci.Electronics.Repair FAQ Home Page by Sam Goldwasser
An excellent resource for repair of electronic equipment.
A site with links to info on early Tape Recorders and Video Tape Recorders
VTR links A transformer winding company that does reasonable priced semi-custom transformers including valve jobbys ,Hampshire Another transformer co. that does one offs,Devon A loudspeaker reconing/recoiling company recommended by a customer Valve and Tube Company IOW , 2011 valves stock bought
by German co www.askjanfirst.com Identifying types of plastic Making your own thermionic valves (if skilled enough)
Obscure lamps http://www.thelightbulb.co.uk/index.php
1939 to 1955 browsable electronic data catalogues , Radio Shack/ Tandy
http://www.radioshackcatalogs.com/catalog_directory.html
Some pages of links to electronics and repair sites
links 1 links 2 links 3 links 4, including for user manuals surface mount device topcode markings and two more for topmarks http://www.marsport.org.uk/smd/mainframe.htm
http://www.schematicsforfree.com/archive/file/COMPONENTS/SMD%20Codebook.pdf
http://clivetec.superihost.com/SMD_CodesT.htm
"part marking", "top code", "topcode" ,"top mark", "topmark" ,"marking" as synonym adjunct keywords for SMD device coding via Google
along with "datasheet" or "data" if many irrelevant returns eg searching for SMD topmark D132 data , then
("D132" AND "datasheet" "top code" OR "topcode" OR "top mark" OR "topmark" OR "marking" OR "code" OR "part marking" )
entered into the searchbox. Or ("D132" AND "filetype:pdf" "top code" OR "topcode" OR "top mark" OR "topmark"
OR "marking" OR "code" OR "part marking" ) limiting to trade pdf sources only. Any more synonyms gratefully received.
Or best search engine for picking up letter pairs / triplets, google not too
good for this.
If the alphanumeric grouping is part srtring of a long type name then try the "contained in" search on alldatasheet.com
I get the impression,generally for SMD codings, that if the code is 2 or 3 characters, including punctuation or graphics or inverted or other alphabet characters then a SMD code. If 3 or more only regular letters and numbers
then a curtailed part of a long part number, generally excluding maker part and package part
Or anyone knows of a replacement for this , in its time very useful NEAR
function for Google searches?
http://www.staggernation.com/cgi-bin/gaps.cgi
ie in this case "marking" NEAR "D132" within 1 , 2 or 3 words that order or
each way , selectable
Some surface mount fuse ratings as marking letter code (Schurter)
0.375 Amp E
0.5 Amp F
0.75 Amp G
1 Amp H
1.25 Amp J
1.5 Amp K
2 Amp N
2.5 Amp O
3 Amp P
4 Amp S
Television and Video recorder viewer adjustments, Contents , tuning in tuners etc
was on http://www.oh-bugger.net.nz/eric/tune_in.html
user manuals for turntables:
http://www.vinylengine.com/library.shtml
philips user manuals:
http://www.p4c.philips.com/cgi-bin/dcbint/cpproduct_selector.pl?slg=ENG
panasonic manuals here:
http://www.support.panasonic.co.nz/framemanuals.htm
general user manual collections
http://www.theusermanualsite.com
http://www.User-Manual-Search.com
A useful book on discrete build SMPS
Simplified design of Switching Power Supplies
by John D Lenk, 1995
Also mention of the deja news site now part of google.com
Deja News - The Source for Internet Newsgroups!
Select all rather than recent and put in keywords sci.electronics* and
one or two keywords of your specific interest.
A useful internet test-card for checking computer monitors (connected to internet enabled PC) Something for the hifi nuts
was on www.netcentral.co.uk/satcure/audio/scam.htm
Diverse Devices,Southampton,England
Telephone number - the same number as it has been since 1988
but email is now the preferred method of contact so number deliberately not placed here.
I devote time each day to replying to emails.
(obscure/obsolete components,second hand test equipment,
schematics etc)
Postal:
66 Ivy Rd,
St Denys,
Southampton,
SO17 2JN
England
A reserve email account is diverse9(commercial at)fastmail.fm. Please make emails plain text only , no more than 5KByte or 500 words.
Anyone sending larger texts or attachments such as digital signatures, pictures etc will have
them automatically deleted on the server. I will be totally unaware of this - sorry, again
blame the spammers.
More hints & tips and repair briefs on
homepage http://home.graffiti.net/diverse:graffiti.net/
The type with the spring metal interior and soft plastic/rubber covering that breaks up by the metal strap cutting it, and matching the fittings into frame/ sub-frame is difficult to find suitable replacement. Used by Peavey etc. Remove the handle and strip off the plastic. Wind on some spiral wrap cable sleeving from the housing edge minus one turn at one end to similar at the other. 300mm of 1/4 inch spiral gives 85mm over 25mm handle. Shown de-twisted between 2 molegrips on the cabinet. The card under the handle is just for contrast in the pic. Glue 4 lines of soft plastic beads or cut sleeving on the underside of the handle, on every other groove, will form finger dedents. Cover with some heatshrink and heat so the wave of wrap appears and repeat for extra strength. The ripples giving a bit more sureness of grip. Or simply mark a pair of lines at each end - where the edge of the cheek is on the metal strip innermost and outermost of strip movement. Spiral wrap between the inner pair and thick heatshrink between the outer pair. Retain the broken ends of the rubber as packing inside the cheeks or add rubber washers if totally broken up , to protect the heat shrink ends from rubbing against cheek ends . The metal ribbon will have difficulty cutting through the nylon. Repairing such type handle end anchors, where part has cracked away and all too easy for the bolt head to pass through the slot in the steel of the handle. An insulator from the thru chassis part of a large screw terminal. Measure the gap under the cover , large steel washer with hole large enough to pass the stem of the insulator and pass thru the slot of the spring steel blade and a small washer , outside larger than hole in the large washer and its hole to take the bolt. Assuming not asbestor reinforced bakelite cut down the length of the insulator to housing depth minus small washer thickness. Assemble insulator then blade then large washer , then small , then cover and pass bolt through. Broken pcb traces and pads, bridging pcb holes that are too small for the component leg going throuh, so solder cracks, etc Thats what I've done before and bits of desolder braid and stripped coax shielding and also scraping back board/trace lacquer for more contact area and folding back leads along traces before soldering. Eventually found a hobby shop with what I was after 2 copper and 2 brass 80 mesh 5 x 6 inch sheets, bit finer than I was after but finer is better than coarser. Amaco of Indianapolis , Wireform Metal Mesh and Wiremesh woven Fabric. Presumably bigger sheets of it are used by the mind control nutters. A 2 hole paper punch makes neat 5mm pads and a needle to make a pilot hole. While there I could not resist a bag of miniature wooden 3/4 inch long sprung clothes pegs by Artstraws ,Swansea, (apparently for suspending chrismas cards, undamaged, from string) for holding small bits while soldering or gluing (as will not heatsink , useful for holding thick wire in banana plug recess and then soldering ), and I use the full size traditional wooden ones for so many things , including broken apart for wedges. Spectacles and electronic repair. If your specs have metal side-arms then cover with some small diameter heatshrink tubing before they fall off in some kit. Small 3-jaw chucks , Dremmel size If dropped and the 3 jaws fly out (and you find them and the 3 springs) To refit , find a small bottle cap or something , that you can lay all 3 inside, in a ring , with the springs just located in the recesses. Then place the outer cone over , press down , and hopefully at that low compression state , you can get a finger over and press in home. Don't know what , if anything, was in there holding in place but I replaced with a rubber O ring. Reinforcing failed solder pads Reinforcing solder points on dropper resistors, subjected to vibration. Forcing a small pad of mesh over the lead and burying in the solder. My local decent hardware shop has nothing , a local machine mart has expanded brass sheet but that is too coarse. I have used desoplder braid before and stripped coax shielding but they are both messy for cutting small pads and also pushing mesh over the leads would give a bit of mechanical grip even without any solder. For large pads I've also used cut down and cleaned up old perforated zinc as used in old larders for ventilation but keeping flies out. It seems to solder quite well but its a bit thick for most components I can only assume I will see more and more of these bad joints due to lead-free soldering. Recently I returned a Marshall valvestate to its owner. I had previously, last year , had to reinforce solder the main caps, which is common enough with leaded solder in combos. At that time I did not realise it was probably lead-free soldering especially as made 1998. This time 5 different medium size components had bad solder. Including one I've never seen from normal use rather than over-current/ heating. A flat-pack bridge rectifier had one visually obvious bad joint. I pushed on the adjascent corner with just finger pressure of perhaps 8 to 16 ounces and that pushed through. I had told him about this lead-free business when he dropped it off. When he picked it up he said he'd mentioned it to a relative of his who works for Marconi Aerospace and he was told the same about the problems they have with it in their area. There are plenty of industrial suppliers of such mesh by the square m or by the m but I was after more sample sizing for this purpose. The pack of hobby "keepsakes & card" making sheets would be enough for 2,000 or so little copper and brass mesh pads. Now got enough brass and copper cloth to keep me in pads for years but I will have to be aware of shedding the odd almost hair sized bits of copper wire fraying off the edges of this cloth - worse than tin whiskers. Selvidge the edges of these bits of metal "cloth". Cold testing an amp Where there has been major damage involving a lot of components and before daring to power up . So testing with removed components or new , with a DVM for "diode" tests etc. Remove the power supply reservoir caps to stop the probe voltage slow charging effects from the caps. Loudspeaker repairs and reconing . Distortion due to voice coil rubbing the slot. De mount and power up at a suitable frequency. Just in one position very lightly push the cone radially outwards and the distortion will get markedly worse. On the vertically opposite part of the cone stick a bit of insulating tape pulled and wrapped under the frame,hopefully distortion gone. Then a thin "wash" of hot-melt glue in half inch strips either side of the insulation tape over the flexible corrugations. When cold removed the tape . The following i have not tried yet tip from someone else. I would use brass shim rather than feeler guages because of the magnet. And metal caps may be swaged to the body requiring grinding of at least one swage point to get access to lever off,covering cone area to avoid iron filings getting inside. I have repaired many speakers. Using acetone, unglue the cone at the outer edge and unglue the voicecoil cap. You will need sets of 4 feeler gauges of various thicknesses. Put the feeler gauges 90 degrees apart in the voicecoil gap. Put Glyptol glue between the cone and the outer surround and clamp using wooden clothespins. Leave for an hour, remove the clothespins and the gauges, glue the cap back on and reinstall. I recently did this with a special size speaker in my car for which the dealer wanted $125. It has worked perfectly ever since. Bert Christensen, Toronto, Ontario Carlsbro Powertone repair. Due to dirt in use or at manufacture? Carlsboro 10 inch ,open circuit, so burrowed in to explore. On the phenolic cylinder that is the former for the voice coil . 4 pairs of scored ines( stand out white against the amber colour of the phenolic). Each pair about 6 to 7mm apart and arranged pairwise diametrically. I suspect 4 pieces of sharp edged metal shim used in the original cone setting and scored on removal. All the lines go axially , fully from one end to the other , so if made in use would require the diaphragm (spider?) being driven 10 mm into the magnet housing. Apart from the nearly symetrical distribution of the lines. the lines are on the smooth internal surface that glides over the central section of the magnet, not the coil surface. I doubt the lines are anything to do with the failure, that is well outside the coil area. Probably due to stress on epoxy curing on a supposed stress relieving bend of the coil runout wire inside a fillet ring of epoxy where the cone meets the phenolic cylinder and before the join with the pigtail, so repairable. There is no overheating , scoring or any damage to the coil or elesewhere just these lines. http://home.graffiti.net/diverse:graffiti.net/voice_coil.jpg The woven and corrugated yellow part I've labelled purple "S" is called the spider. The cone is to the other side of it. "L" is the lead out of the coil and "G" is some sort of optical guide laid in the layup, on the manderel, of the phenolic for placing the lead-outs to then meet up with the pigtails at the cone. Moire fringing is where the coil is. A second sight guide and second of a pair score line is part in shadow off to the upper right. There is a third and fourth pair of lines diametrically opposite these 2 pairs If it was scoring from expandable/contractable mandrel or a chuck of some sort I'd expect it to be engineered and pairs of lines exactly 6mm or something precise apart, these are about 6 to 8 mm apart and some lines have a nearby accompanying line. They are white as in scoring not grooves set in at moulding . Or more likely no marks as what is the point if the process leaves such serious imperfections where you don't want them. Any bits of swarf or grit, causing lines in service, would be only half the length of these lines. They extend the whole axial length of the coil former, into the dome space. Voice coil data 45 turns, 2 layer, so 90 turns, so no over or underlap problem with the tails. layer 12mm wide, overal 46.1mm diam , including 0.1mm phenolic , wire layers 0.54 - 0.1mm thick Removed the dome and heated off cone and spider joins. For removing either cone or spider if using hot air. Necause of the heatsinking of the basket mask of the cone or spider with curved insulated material to protect the corrugations etc from distorting permanently from the applied heat Break in the wire going from the pigtail to the voicecoil tail , inside the ring of epoxy joining the spider to the voicecoil. Bridged a repair and re-coned as above but this time hot-melt glued a nylon pcb spacer at each mount hole , to give a tapered sliding, but finally well aligned fit to the basket rim, removed after contact gluing. Clear out any (non magnetic only ?) material from the VC magnet slot with a piece of brass wide+thick enough and straight sided, requiring to flex in the middle and so scrape both faces of th eslot. Blow out with air duster aerosol with a short length of spaghetti tube added at the end of delivery tube Before reconing put about 1/2 inch of doming into the spider as its easier to do in free space than after the gluing process. Prop out the space between the cone and the spider to give about 5/8 of doming and heat with hot air to give a cold set of about half an inch For dropping the cone and spider (contact glued) use narrow pieces of credit card is usually about right to deform the VC former enough but not escessive to hold the VC section into the magnet while the glue goes off. Refixing the cloth/filter dome , use hotmelt string and then run some black ink admixed in runny glue around the hotmelt in the hollow, to give a better looking finish. Making a UK square pin plug protector. For protecting other vulnerable kit in transport , if squashed pins first , into it. Find an old plug , wrap plumbers PTFE around pins and the base plastic of the plug. Then a number of turns of PTFE tight around all 3 pins pre-heat with hot air and fill the central area with low melt , soft form hotmelt glue High power combos that go intermittant after a period of use. If they use an elbow jack on the amp to speaker link , replace with conventional. Check the internal construction and if poor mechanical connection at the elbow means a resistance and voltage drop, heating the plastic disc that is all that forces a mechanical connection, so progressively worsens. When cold pliers may turn the spindle part but when heated by current , can turn by use of fingers. For such a plug that is not too bad, cut a couple of flexible washers to place under the soldering to the central pole, in case the following depresses into the casing. Place a dense rubber pad like a tap washer over the pin and clamp the cover over the top to compress down on the central pole. Elmwood thermal switches. You won't be able to change the switching temperature but you can change the function. ie normally open to normally closed or vice versa. The metal cylinder part is swagged over a lip on the bakelite cylinder. Grind into this swaging on both sides just to break the grip. Prize back one half of the swaging and separate the two, beware of small connecting pin dropping out. Then prize away the locating disc structure. This exposes the bi-metal dome disc that does the positive snap action . Simply invert the dome , with the dome located in the locator part, and replace the heated end-plate section, re-assemble the bakelite section and coble together something to wrap around the swaging part to hold back in place. Dome towards the switch is cold off, dome away then cold on. Tried converting some 16V froststats to higher temperature set points but failure. Grinding diametric cuts on the concave side has no effect G-V, USA, thermal switches Old type, linear bimetal, not snap action dome, can be changed slightly by cutting the epoxy covering to the exposed adjustment screw and adjusting by wiring up to meter and placing in a polythene bag in a heated can of water with a thermometer. The action can be reversed from normally closed to normally open but not at the same temperature. Desolder the can at the juncture. Undo the adjustment screw so no longer in contact, bend one of the contact arms towards the wiring end. 15 thou gap in the contacts gave 50 deg C going s/c and 46 deg C o/c on cooling for what was originally 100 degC normally closed. Opening gap to 26 thou and switching temp was >100 deg C so not very deterministic. Reducing to 18 thou was 70 to 75 degrees. For 20 degree C ones Beware the arm with the glass bead is not poitively held in place and tiny spring under. The glass bead is the electrical isolation. To change the action bend the pin with the glass bead nearer the centre and back to the bimetal end to engage on the nearest contact arm rather than through the hole. Deglue the adjustment screw, remove and grind back the ceramic plufg a mm and add a 2.5mm glass bead over, by placing under the contact arm and reintrooducing the adjuster. Could get a grat range of adjustment temperatiure in the opposite switching polarity but the full range from 20 to over 100 deg C was only about half a turn of the adjuster so difficult to set. Oscilloscope Y Amp problems. For dual channel scopes where there is a problem with one channel only. Compare DC levels and signals between good and bad amps like stereo amp problems where one channel has failed. Bad pots due to bad wiper contacts rather than worn track Instead of retensioning the sprung action of conductive or resistive wipers , perhaps a half-mm cut circle of material placed between paxolin and die cast . To avoid parts of th ewiper disc touching the end of the central soldering tag , grind back the inner end of that riveted solder tag. For PbF soldering work, wipe off the solder before cooling down , to reduce the etching errosion on th esoldering iron metal by the acidic flux. Festoon bulbs. Difficult to find these days for old tuner amp dial scales etc. If there is space available then convert high wattage MES screw bulb. Assuming 1 1/4 in barrel fuse type. Break the glass of the original or 1 1/4 inch fuse. Solder one end piece radially to the screw part of the MES. Solder a piece of silicone or ptfe covered wire to the nib of the MES and the other end cap to the other end of wire. Mount the bulb in the lower yoke if vertically mounted. Replacement LCD unobtanium Zebra is unlikely to match in dimensions , same with pinning not going to match but has anyone successfully wired in (or whatever) via conductive epoxy (or whatever) onto the lands of a totally different display and soldered to the pcb. Anunciators may not be a match either At least the sequencing of segments is fairly consistent. Fluke 77 , used for unpowered/cold checks. I managed to blow up my work-a-day sacrificial el-cheapo no-name DVM a couple of weeks back putting 2000 V on the 1000V range. Not dumped , as the large LCD , for the Fluke. Just tried the display on 50 Hz sig gen and straightforward segment pinning (all segments ok) , I'd have to use the hFE anunciator perhaps as "2" mid segment for 2.999 Fluke use as this is only 1.999 max. Land spacing 1.2mm so easy staggered conductive epoxying of fine wires. Loads of other anunciators not used on the original like nF,uF, deg C etc I did not know were there. Conductive epoxy is all very nice if you use it regularly but its gone off if rarely used. Conductive hot-melt is good enough for LCD use, very low current, hundreds of ohms or kohms. Run some graphite powder along the lands, clean away from the non coated parts with a cocktail stick. Then small dots of hotmelt precharged/mixed with graphite but only just retain a gluing function, ie as conductive as possible. Then melt in prepared copper wire one by one , later. I tried one of these joins and the 0.05mm diam wire broke before the joint broke. Then a run of decent hotmelt glue along the completed joins, after checking electrical functionality with a sig gen . Patch leads for prototype/test bed Lost most of the leads with .5mm pins at the end engaging with the .5mm sockets. 20 thou/ 0.5mm enamelled wire with the ends stripped back works just as well if careful. Cleaning nicotine off kit Use aerosol oven cleaner , test on a small patch first especially for fastness of lettering/legends/plastics softening. For knobs or cables place in a tray and let the spray foam up. Wash off residue with methylated spirits and polish up with furniture polish. Festoon lamps Barrel shaped lamps about 1 1/4 inch fuse-size often difficult to find replacements. The barrels of christmas tree lights are about the same size and come in a range of voltages, scrape off any varnish. Hacksaw/cut/melt away the plastic housing and extend one of the wires to make axial. Coloured lamps Coat with coloured nail varnish or household varnish mixed with suitable dyestuff such as artist's oil paint from tubes. Surface mount PbF device coding ST IC maker and Panasonic surface mount Al electrolytics are both coded for PbF compliance with a small dot or small square after or under the product number , is this common with other makers, the microdot ? also ON Semi use such marks and Renesas http://www.renesas.eu/products/lead/specific_info/el/opto_rfmicrowave/index.jsp Halogen filament lamp Eurosonic 80V, G80 , 240V , outer envelope not vacuumed Osram 64480 , 240V, E27/ES 250W, outer envelope not vacuumed either Present to avoid touching the mainenvelopes Awkward power tranny to heatsink spring clip How to remove and replace or even initially place (without possibly straining the legs of the tranny by lateral forces) such spring clips as in this 2 angle view heatsink and spring clip I slid a thin piece of PTFE sheet between body of tranny and the clip , pulled outwards with thin nosed pliers, and then drove the clip along the slot in the aluminium heatsink, with a punch and hammer to undo, but how to reassemble. I've slid the clip along the slot (slot profile shows just under the red "S" on the other heat sink) but not replaced over the tranny for the pic. It requires pulling and sliding at the same time The one pictured has space in front to manipulate with perhaps a lever with 2 pins do the double operation of pull in one direction and push transversely at the same time but its complement is hidden behind some large caps, so not possible with that one. Its not possible to just push the top of the clip into the slot as is often the case with other such spring clips. The best I can think of so far for clipping or unclipping. Grease in the slot and a small wedge to the thickness of the transistor laid to the side of the transistor and a thin covering of PTFA sheet over the wedge and transistor and lever or push the spring clip across. Email reply from the amp maker's engineer "As to the spring clips, there is no real way of removing and refitting those, except by sliding them on to the heatsink slots. That can only be done when loose (no devices in place ). Hence, they have to be mounted on to the heatsinks before sliding them over the devices." My bit of (clothes line peg) wedge and ptfe sheet method did work but if the applied force along the slot, is not axial to it then the high-C steel clips easily dig into the aluminium and jam fast. I found a large pair of engineers cramps would gradually inch it across, taking up the slack every few mm , and starting again. Just another thought, with a pair of large sewing thimbles on opposing finger/thumb you may be able to use enough finger pressure to slide the clip up the wedge. But otherwise matter of desoldering the power devices and removing the heatsink with trannies and then the trannies can be easily slid out from under the springs. For replacing. Cut in half a length of 6.2mm across flats hex pcb standoff. Grind a bit of slope on one side of each may assist, or twisting into place with pliers. While pulling or levering out each spring, slide one of the bits of rod into the curved area of spring. Split hex to give enough space for transistor heatsink so the spring can come down on the body when they are removed. With a temporary long bolt screwed in place of final one for location only, screw the heatsink in place with one and then replace the long one, before removing the bits of hex. Fudge to give a bit more life to "scratchy" slider pots without opening up the kit Indroduce mixture of silicon grease and graphite powder through the front access slot. Use a hypodermic syringe without needle ,fit a length of small diameter heatshrink or other thin walled tubing to get the mix down on the pot track. Using a digital camera for recording circuit details etc Using a camera without 'Macro' facility make up a crude mount to locate another lens over the original lens as a close-up supplementary lens to focus in closer. Larger heatshrink diameter required than the layflat tubing available. Varies with formulation of the heatshrink. Very limited final width for this and a pair of diametrically opposite spout shaped "ears" that will likely not shrink , so not ideal solution. Say the layflat heatshrink you have then maximum diameter as it stands is about 44mm. The final width is limited to about 20mm of which only 10mm all round will be fully tensioned, but diameter of about 90mm max. This is the maximum, smaller than 90mm will give better final width by choosing smaller ellipse but still very limited. With string, pen and 2 drawing pins do the draw an elipse on paper thing. Fold in half longways and lay long "diameter" along the edge of the tubing. So half minor "diameter" of 35mm and long diameter of 110 mm mark and cut the tubing with the elipse as a template. Trim up the remainder of the tubing to give 2 elipses about 35mm apart and a rough ring of layflat when the residual fold on the other side is cut. Place the ring around the object and warm with hot air avoiding the loose part doubling back on itself rather than towards the object. Removing minimal C-clip/ circlips The type that recess into a groove without any extensions or gaps to get a dart point under, as found on pot and switch bushes Grind a slot at the closed end of the clip into the stem enough to see colour change, but avoiding grinding into the circlip. Then a dart point to get purchase in there. Made a tool from an old worn out pair of end snips , grind a ring into one cutting edge and reduce the thickness at that area to allow getting into a slot and the other cutting edge against the stem . Don't know if this tool will work , will have to wait for the next opportunity but the first method does work Extending a pot shaft Assuming enough room for a short length of sleeve to cover the join. Cut a slot in existing and a slot in a piece of salvaged pot shaft and find a piece of cable tie or something to fill the slots. Extend marks down the rods to mark the slot posistions . Dremmel grind off the knurled part of an F connector if right inside dimension. Swathe epoxy over one slot and introduce the bit of nylon , push into the sleeve half way, epoxy on the other part and squash in , turning to check it is located. Source of Woods metal Pillar type ceramic and wire-wound resistor with the spring that breaks contact if higher than normal service temperature but less than tin/lead solder temp. Apply a low temp soldering iron to the Woods-solder blob. Or repair by clamping closed and low-temp resolder back into place How to salvage SMD LEDs from heatsinked surface? Closely packed slivers soldered (nearly) directly onto aluminium. Place on a hotplate at what temp and then what? If ptfe or similar interlayer under the traces then perhaps shearing LEDs with traces off the Al, but what if aluminium oxide? Calibrating electronic keyboards. For a 5 octave keyboard and counting the "white" keys only the leftmost is probably C then keys number 7 and 14 are C also, 14 is middle C and middle A is the fifth key above that. Middle A reading 440.000 +/- a little on a crystal controlled frequency meter then middle C should read 261.625 +/- a little. If the waveform of the keyboard is not suitable for the counter then sum the keyboard and isolated audio generator together and listen on phones for minimum beats and measure the f of the generator on the counter. Amp and speaker - soak test. Without tying up a signal generator and minimising audible intrusion into the work shop. Starting with a basic cheapo microphone . Make an in-line adaptor with just something like 100nF and 3 ohm in series across the cable as a crude filter for the mains hash. Plug in-line and place the mic near as possible to the mains transformer and cover the speaker with old sleeping bags, cushions etc. Low f hum is not too disturbing compared to 400Hz or 1KHz and gives a reasonable work out for the ears being less responsive there. Desoldering the likes of close-pinned switches and not wishing to use hot-air for closeness of SMD/fine traces, Add solder with a soldering iron to form a net/puddle touching all switches, while pulling from the other side. Converting the likes of French Secme small rotary switches from 2 pole 3 position detented to 2 posistion detented, the outer pair. Small blade between arm and body lid to prize off. With the blade still in place, turn upside down so the tiny spring-loaded contacts stay in their wells. a dot of silicone grease helps in holding these. Remove the detent plastic form ( of 3 connected Vs for the spring loaded pawl to swing into) Meld a blob of hotmelt glue in the cental section to give a smooth face between the outer Vs. Reassemble and glue the end of the lid away from the pair of catches at the protruding arm end. Variant for 4 pole. Grind of the ledge that receives the lid and the axial nib on the rotor that engages in there. Glue the 2 rotors together. Assemble both rotors in one cover and while holding against the pawl, slide the other cover over and lightly clamp in place. Check contacts and wiring as not symmetrical etc. Glue the 2 halves with hotmelt. Make op wire tails to go to pcb. XLR connectors , no name seen 3 grub screws, one for active end and 2 for cable grip. The single one screw inwards to release the pin end. Try and slacken the other grubs , normal undoing, and leave in place. Don't loose the 2 part cylinder metal collars under these grubs as awkward to replace even without a cable through the centre Refitting a daughter board. Where there are isolated bladed copper pins fitted edgewise and soldered perpendiculer into a line of holes in the main pcb. Easy to remove but a real pain trying to refit when surrounded by close fitting other stuff. There is no matrix structure to align the pins with sufficient accuracy and no room to tweak posistions with a small blade. With soldering iron clean up any blobs off the pins, and open out the main pcb solder pad holes with a darts point. Dremmel with cone cintrided bit to open out the opposite side of the board to make a bit conical. Disc in dremmel and grind off any remnant solder blobs and grind chamfers on the ends of the pins to make a bit more pointlike. Align the pins visually and then if possible via a same spacing proper connector or try inserting on the solder side as a template. If still will not align , do not force, note which pins are out from viewing through the holes and repositioning. Still jamming ? try some engineer's blue or permanent black felt tip pen along the line of holes for telltale mark. Dented central dome to speaker cone. I've not found the ideal solution yet. Any tame car panel-beaters out there ?. You know the ones. A large angular dent in a car body panel and you hand over some cash and they say turn round a second/ walk round the block. Then they kick the panel, but they know exactly which spot to kick. Working speaker but the large perforation-type front grill kicked in or dropped so it touched the cosmetic dome at the centre of the cone leaving a number of depressions. I tried heating with a hot air gun to maybe soften and sucking with a vacuum cleaner hose - no good. Tried some dabs of hot-melt in the dents, alowing to cool and pulling in conjunction with 1 pound weight in some undeformed areas re-created the dome and then lightly heated with hot air to remove the glue - but didn't cleanly release and had to dust with toner powder to matt it out - but otherwise a re-formed dome. Anyone been here before with better ideas. ? Weights and vacuum cleaner ? Funnel covering all or most of dome and vacuum ? Cutting small slots in pcb Where there is a different footprint for a replacement item and you have to pierce the pcb, in slightly different positions to the original, to push pins through. In actual case ultra-miniature pcb mount toggle switch with thick pins, not bendable, to go on a populated board. Footprint of 6 pins on slightly larger , in terms of centre spacings than the original, so cannot , without making a jig , drill new holes. The drill would drop into the original hole. So a matter of short radial slots out to the replacement positions. Enlarging the existing holes would require filling with glue or something for structural integrity , after soldering. Use a small drill bit in a dremmel and use the fluted part of the drill but its more melting by friction than cutting. I tried grinding notches around a sewing needle but that did not work. Dental burrs look like the tool of choise for this . Modding with a toggle switch in a case with insufficient space , so protruding through the casing and bush nut not holding to the case . Cut rectangle in case to take the sw body. A pair of large solder tags bent into joggled Z shape and fitted over the bush either side and nutted down. 2 small nuts and bolts either side through the casing to hold in place. PTFE string For tying hot components together enough to stop any vibration building up eg lines of on-end emitter resistors. Start with the thick formulation of plumber's PTFE tape and twist a cut length and then stretch it. Not brilliant for tying purposes as it can still stretch but if the force in tying is not too great then at least better than nothing. Maybe if only the thin type then cut 3 lengths , separately twist and then counter twist all 3 together and stretch. Testing combo amps Beware if testing with the amp in the cab but not all retaining screws in place and tightened then a rattley noise can be from the captive nuts rattling in the chassis. For general idea of bass response put a microphone in the input and the mike near the mains transformer for mains hum. It is a common failing of combo amps due to long leaded resistors or capacitors ,usually bulky ones, to resonate and flex in sympathy with some speaker frequency/power. If the lead is high copper content then it work hardens and fractures, usually at or in the board. Replace with a larger diameter pin , or remount with a ceremic bead and a button of that orange silicone rubber salvaged from the output pressure roller opposite the fuser roller of a photocopier to take the temperature and damp any vibration. For testing speakers at power and not to inconvenience yourself or neighbours. Choose a very low frequency like 70Hz with speaker face down on carpet and sleeping bags or similar around the box. Soldering station mod Where there is a large spring arrangement supporting the soldering-iron. Surround the spring with a sheet of expanded metal wire-tied at the rear. It avoids that all too common problem of unknowingly draping a lead into the spring and onto the heated element. Digital camera micro-fiche printing Assuming the exposure level of your camera goes low enough it is possible to photograph micro-fiche reader screens and then print out via pc, use some sort of steady camera mount eg rubber footed "trivet", like aerial reconaisance photo veiwers. Toroidal transformers Needed a replacement doughnut shaped transformer to replace a blown one. One i had available had been epoxy sealed in the core with screwed inserts for mounting purposes. The one i required needed to be plain hollow core. The epoxy fill (at least in this one) was heavily bulked out with chalk or other bulking agent to reduce cost and was easily "drilled" out sufficient to give clearance for the original mounting bolt. Converting one contact on a standart 1/4 inch jack socket to isolated switch action. Remove the movong contact and slide a squashed Hama bead over the dimple section. Cut the plastic divider walls of the plastic frame just in this central section to still block the contact moving on jack insertion and also stop the bead from sliding out of position. Oriental script rubber stamped onto pcb Roundel stamp on the [ script on top and bottom sections and 3 numbers across the middle eg 86 12 15 does not mean 1986, Dec 15 I was exploring use of polyswitch / reset fuse MF-R110 , 5mm 1.1 amp hold current in its PTC thermal properties to lay on the outside added in series with a solenoid as a protector. In olden days of bulky VCRs there was 2 coils , the pull-in and the hold, to avoid heat build up. Anyway data for this particular type of small polyswitch , as I can see being useful in other non mains fuse situations. 20 to 42 deg C, 0.2 ohm 66 deg , .3 92 , .4 100, .45 108 , .5 118 , .7 122, 1 123, 2.5 126 deg C, 11 ohms then goes shooting off Polyswitch voltage rating Hold current (marking divided by 100 usually) is roughly proportional to area and open circuit voltage is roughly proportional to thickness (including wires) 1.5mm , 25 volts 1.7mm , 30V 3mm , 60V 3.8mm , 120V 5.1mm, 120V 5.8mm, 240V Testing for RoHS/PbF solder LTSIT (Low Temperature Soldering Iron Test) Using a never used reserve thermocouple monitored variable temp OK soldering iron set up for a tester. 185C/365F for SnPb and 217C/422F for production PbF seems about the temperatures. Olive oil in a heated bath (with flammability precautions in place) will go up to 210 deg C without smoking or boiling. I calibrated the iron tip in an oil bath with a 250 deg C glass thermometer, to a known 200 deg C with the heater LED slow intermittent. Tried distinguishing known 60/40 leaded solder and known silver solder 95.5/4/.5 and had to drop the set point down to 185 C to melt leaded solder wire on the tip and not melt silver solder wire. More than just the test part of the tip in the oil so perhaps explains the lower set point. Swathed the tip with tallow-looking conventional solder flux over the tip to assist action. So distinguishing Pb/Sn and production PbF should be more straightforward with this "test iron" . Testing on IC/small transistor pad/joints (least heatsinking) and then by inference the same solder used in the usual suspect areas, ie larger pads, larger leads but PbF not up to the job. 3 more physical tests. Grey mark on paper. Scrape back surface of the solder and rub a specific number of times and force, with some copier paper over a cocktail stick. Leaded solder leaves a much darker grey mark, nearer black, on the paper. Admixing molten leaded solder into lead-free solder and on cooling the result will solidify much more suddenly than for leaded solder of same size and the result will be a white/grey crystalline looking appearance although clear silvery finish initially. Indentation test The following using a well worn automatic centre punch, so a new sharper one for use only on soft metals is probably called for. This one, existing spring replaced with a lighter one giving a load before trigger of 3.5Kg. Comparing block of copper,Al, roofing lead and off the roll solder wire,63/37 and 85.5/4/.5 silver solder laid over the lead as a soft anvil. Steel rule with 1/100 inch markings and a x30 basic microscope Measuring diameters of the indentations (x10 thou/mil) Cu 1.5 Al 2.5 high tin PbF solder 3 SnPb 4 Pb 5 Had to decide whether a 2003 board had failed solder due to SnPb or PbF and excess heat , where it was used. Could not decide by appearance, good mirror finish, lack of pastiness but solder joints too shallow to tell domed from conical, so probably SnPb. If a ring-crack or "ravine" crevice is obseved, under 30x microscope, then probably PbF. Low temp soldering iron test, melted - SnPb Paper test , decidedly black - SnPb and indentation test much nearer Pb diameter than Al so - SnPb. As I've not got a separate centre punch yet and swapping springs for this test I have to check with a lump of aluminium and a lump of lead to calibrate each time. Had not developed the chemical test at that stage. Chemical test Got some spirit of salts (32 percent hydrochloric acid) from a traditional hardware shop. (A poison's license is now required , it seems , for selling HCL in the UK these days. No colour reaction found heated with leaded solder but on cooling a white deposit would suggest lead chloride and then Potassium Iodide KI added, now seems a number of repeated heating/cooling cycles is required. I increased sample sizes to about 3cc of 32% HCl and about 30 cu-mm of solder wire. About 1/3 of the wire scraped with a razor blade into scrapings and remainder added as round and the part round remnant . NB BEWARE when boiling the hydrochloric acid , point the test tube away from you, perhaps a loose plug of cotton wool in the mouth of the tube, only just holding in the tube, not compacted in. Use holding tongs to keep the emerging vapour away from your fingers. Plenty of ventillation or preferably fume cupboard or outdoors. Especially important on re-heatings as due to lack of nucleation points , or whatever the reason, it does not slightly boil first like a kettle but can erupt without warning , so only gentle slow warming. After boiling and cooling twice then perhaps about 30 cu-mm of KI added and a couple of repeated boiling and cooling. For the leaded one bright orange crystals? soon appear on forced cooling and flecks of glistening gold colour the second time of heating cooling after KI added . Cor, I've managed to transmutate base metal into gold. The glistening gold agrees with my chemistry book for lead testing with KI, don't know about the orange. The colours and crystals disappear on boiling. The lead free one , no colours at all in the liquid but the metal goes black (same with leaded sample but can only be seen when boiled and clear of precipitate). With repeated boiling then still a lot of gas comes off the metal for some time after removing from the heat , unlike the leaded sample. Maybe acting on the 5 percent silver content. The KI came from a kids chemistry set in a charity shop. One way around kids and chemistry and product liability, absolutely no name. Nothing on the box and nothing in the accompanying book for makers name or even country of origin. Another later kit I picked up was named "Discovery World" chemistry lab. Looks as though regular flicking of the test tube is important. Repeated samples and again nothing appearing in the non-lead sample. The odd flecks that would appear when shaken were probably reduced flakes of the original scrapings, again black colour. Looks as though 30 cu-mm is about the right amount of KI with 30 cu-mm of solder and initially 3cc of HCl. I can only estimate using a small spatula that is in fact a stainless steel lobster pick, fork+spoon. The 4mm wide spoon end is ideal for this. No orange colour this time (initially) . Also useful for cleaning any crud from the inside of test tubes as fairly long, spoon bit first and then fork end if really stubborn. Once a very slight yellow tinge to the liquid appears and at boiling and through cooling , much flicking of the tube with a finger, then instead of flecks that look like golden flakes of skin you get a dense mass of more like cream-coloured or sulphur dust colour soap flakes or fern/fan shaped or matted yellow hair looking like kevlar fibres. Reheat and all this dissolves well before boiling point. Allow to cool untouched and then just a small scattering of fine gold-coloured flecks when you flick the tube. The orange colour seems to only appear after repeated heating and cooling or over time, the second SnPb sample is now starting to show this orange colour after 5 or 6 heat/cooling cycles and increasing each time. Second sample of PbF shows no colouration or precipitate, again , so seems repeatable and differentiable. Left the PbF test tube laying around and after about a week the solution was quite red-orange and some orange crystals. Tin Iodide/Stannic Iodide is red-orange and so that delayed colour in the SnPb samples also, is probably indicative of the tin content. Worked quite well , a sample tube , 45mm long,on a scanner bed, required disturbing just before the beam passed under. General orange background colouration due to the tin iodide and the "gold" scintillating flecks from the lead iodide
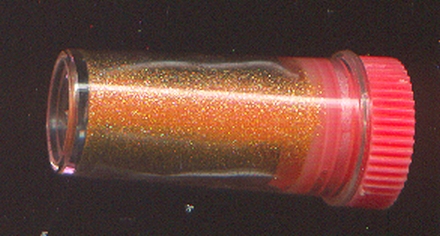
